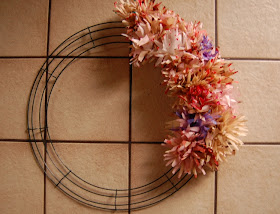
I made a cork wreath last year that I wasn't too keen on and wanted to make a bigger one for our new house. I have been playing a lot with coffee filters in my fiber arts class and saw a couple tutorials on coffee filter flowers and decided to make a coffee filter wreath!
Coffee Filter Wreath
You will need
Coffee filters: I used about 220. 100 white and 120 brown.
Wire wreath armature: I bought mine at the thrift store for 50 cents. I used a wire one because I wired my flowers to the wreath. If you choose to hot glue yours then a cardboard wreath might make more sense.
Acrylic paints, fat colored pens, sharpies, etc: I experimented with a lot of different ways of coloring my coffee filters.
Scissors
Stapler
Large tapestry or darning needle
24 Gauge wire
wire nippers
pliers
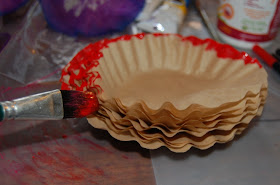
Start by dyeing and coloring all of your coffee filters. I experimented with put a dollop of acrylic paint in a bowl mixed in with a cup of water and dipped the filters into the paint. Then I squeezed out the excess and laid them out to dry. Watering down any acrylic paints is key. You want it more like a stain than thick paint.
I also tried painting the edges and coloring the edges with markers for contrast. I found out bigger and sloppier and more coverage is better since you are going to cut them apart at the next step and lose half the design. I made a couple of flowers first to make sure it would work and then I colored and dyed all my coffee filters in advance so I would have a lot of different colors and designs to mix up together. The whole kitchen and dining room floor was covered with drying coffee filters. My husband can't wait until I've got my new studio up and running!
When your filters are dry, lay them in stacks of 3 or 4, depending on how heavy duty your scissors are.
Fold stack in half and then half again so that you have a wedge shape.
Cut out the petals. These can be rounded or short and stubby or long and pointy. I went for long and pointy.
Stack 4 cut out rounds on top of each other making sure the petals don't line up perfectly. You want a lot of texture.
Squeeze and fold together at the center of the flower and secure with a staple near the bottom.
Repeat, repeat, repeat!
Next, it is really up to you how you want to attach the flowers. It mostly depends what kind of frame you find. I poked two holes at the middle of the flower stems and hooked in a 2 inch piece of wire and wired each flower individually to the frame. I used the pliers to fold down any sharp wires.

I am not sure where to hang the wreath now. I can't permanently attach it to our front door because it is paper after all and I am worried about rain and wind but I am little worried not many will see it over the fireplace. We are having our house warming party tomorrow so I might think of a way to attach it to the front door temporarily.
I love how fluffy and soft it looks. I think you could make endless variations with little fake birds or pine cones.
Less than $7 to make, what are you waiting for?


No comments:
Post a Comment