Showing posts with label crafty. Show all posts
Wednesday, May 7, 2014
Decorate your light switch covers.
Tuesday, April 29, 2014
52 Weeks of Sewing: Week 2: Altering a T-Shirt
Unless I know exactly what I am buying and have worn it before, I rarely buy clothing online. It never seems to fit like it should and it feels incredibly wasteful to me to ship something back even if it is free shipping.
But a few months ago (ok, let me think, it might actually have been last summer, oops) I fell victim to an online sale at one of my favorite shops, Pin Up Girl Clothing. Their dresses are adorable and I've actually gone to their shop in L.A. to try things on so I know what I can buy online later, but they had this awesome Star Wars vintage style t-shirt on sale and I read the reviews on sizing and thought a large would be ok. But then it came and it was swimming on me. I think it's supposed to be a little loose and meant to show off a bra or tank top underneath, but I felt like I was wearing a muumuu.
My old sewing machine wasn't so hot with stretch fabrics so I set it aside. Now, however, I have my new Brother sewing machine, multi-tasker that it is, and I just knew that I could now tackle this teeny tiny project.
Tuesday, April 15, 2014
52 Weeks of Sewing: Week 1: Zippered Pouch
Welcome to my first project in my bigger quest of 52 weeks of sewing. I've been thinking about sewing some zippered pouches for some time. I used to own a great little zippered pouch I kept drawing supplies in but it turned out it was really a microphone case and I had to give it back to my husband. And I have been missing it ever since.
I didn't need anything fancy, but I needed sturdy material. I worked a little on surface design on canvas a couple of months ago and so I dug those pieces out and got to work.
Monday, April 14, 2014
52 Weeks of Sewing
If I had a motto, it would be: "No time like the present to start a new project!" And I have a crazy idea in mind. To start 52 projects!
OK, even I am not that crazy, yet since I bought my new sewing machine I have been excited to keep working on projects but have lost a bit of my original enthusiasm. Where to start? I have so much fabric around the house, in piles, in bags and boxes in my office closet as well as in my studio. And patterns, ideas, fragments of ideas and sketches piling up all over the place.
It is time to organize. It is time to create.
Wednesday, March 26, 2014
Vanilla Sugar
Among the souvenirs I brought home from my vacation was this packet of vanilla beans that were grown on Maui. Vanilla Beans are the seed pod of an orchid (Vanilla Planifolia) whose flowers have to be pollinated by hand. The beans are then harvested by hand, and then cured for several months before they can be used for cooking and baking. No wonder vanilla beans are so expensive!
I have not used vanilla beans before so I decided to start with an easy project: Vanilla Sugar. So easy to make that I'm adding it to my to-do list for this year's Christmas gifts.
Tuesday, March 25, 2014
A Painted Lampshade
A couple of months ago we finally bought a new sofa. We had been living with a small, beat up leather sofa for the last 10 years and while it worked in our old house, it was far too small for both the living room and for us. We upgraded to a sofa that could fit both of us and the dog and the cat, all at the same time!
But I found I wasn't using the new sofa much. Instead I would curl up on one of our small arm chairs with ottoman across the room. I realized it was because I had no proper reading lamp for the new sofa. And much of the time I spend in the living room I am reading. We weren't sure what kind of lamp to get (another decision!) and then some friends of ours came over and offered to give us a big modern lamp that didn't work in their house anymore.
Yay! It fit perfectly! But there was only one problem.
Thursday, March 13, 2014
Felt Yardage Equals Just A Felt Pillow
I am trying to make some larger felt yardage and despite the fact that I have a pretty big studio, I have been struggling. Wool shrinks around 30% from layout to finished product so to get anything in a large size (like enough for a cape, like I want) you have to start really, really large. And you can make two layers at once using a resist but I didn't want to try that yet as I am still experimenting with pre-felts and layout in general.
I started by making a smaller, test piece on a small table for a sample.
Please Allow Me To Introduce Myself
Hello all. I’m feeling a bit like a debutante arriving to her coming out party. I’ve spent entirely too long debating on what my first blog post should be about and the result is I’m freaking myself out. So, like any self respecting adult, I Googled it. Apparently it’s a bit like any other social interaction in the world. I should tell you my name and a little bit about myself. Duh.
Wednesday, February 12, 2014
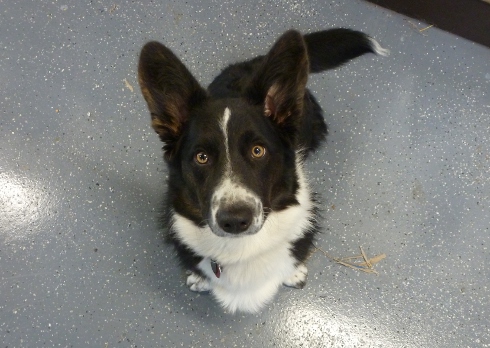
Sewing for Broke (And Corgis)
I was a crazed, sewing fool earlier this week...until my sewing machine broke. I was immersed in a couple of sewing projects and was pretty mad when it happened. It's an inexpensive Elna and while it's over 10 years old (they don't make 'em like they used to) I decided instead of repairing it to buy a new machine. Maybe I will still have it repaired as a back up, but I thought it was time to get a little fancier machine that can handle more than just 8 stitches!
Monday, February 3, 2014
Year of the Horse Needle Felted Sculpture Tutorial
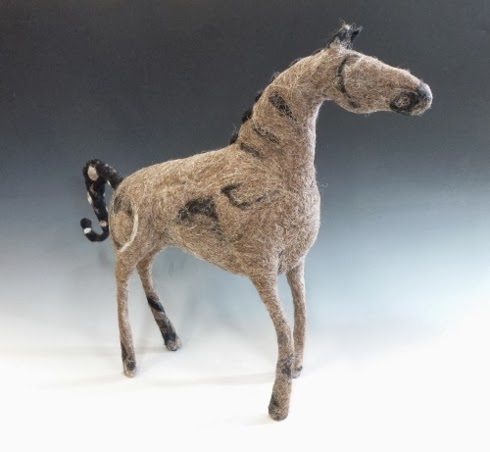
This is now the Year of the Horse, according to the Chinese calendar. Chinese New Year is a big deal here in Tacoma, Every new year (this year it was January 31st), a group of super secret glass artists distribute and hide 100's of glass spheres (Monkeyshines) all over the city. I have never found one. But then again, a lot of my friends get up at 5 AM to go find them and I come along 4 hours later and come up empty. Oh well, one day I will find one!
Instead of a sphere, I decided to make a needle felted year of the horse sculpture.
Monday, December 30, 2013
Craft Project: New Year's Table Setting
This table runner is so simple, but so festive, I may use it year round!
Find yourself some nice heavy cotton zig zag fabric.
Monday, December 16, 2013
Making a Holiday Tree: Part 2
Tuesday, December 10, 2013
Play Date with Metal
I had a zillion things I was supposed to do last weekend but I was reckless and blew them all off to go play with metal all day Saturday at the Tacoma Metal Arts Center.
It's my friend Kimberly's fault. She had a gift certificate for a class and asked if I was interested. I studied making jewelry at North Seattle Community College way back in my early twenties and after getting my degree in sculpture, I haven't played around much with jewelry except tinkering around with reclaimed tin and wire work.
Tuesday, December 3, 2013
Making a Holiday Tree Part 1
UPDATE: Check out my Making a Holiday Tree Part 2 to see the results!
Can you believe I just turned 40 and I have never, ever put up a holiday tree in my adult life? I think I had a roommate or two over the years that put one up but I never had to deal with watering one or worrying about needles falling all over the place or the cat climbing into the branches. I don't really celebrate Christmas except to eat a big meal with family and friends but this year I am going all out.
We are hosting my husband's company party for starters. And then having a big dinner party a week after that and then hosting lots of family members the actual week of Christmas. So I decided it was time to get it together, and decorate.
Tuesday, October 2, 2012
Making A 3D Papier Mache Animal Sculpture: Part 2
Catch the first post in making a 3D animal here.
After I cut out the cardboard and placed and glued the tube inside my dog, I started to cover him with crumpled up newspaper covered with masking tape to make the bulk of his body. I like completely covering it with tape because it makes a smoother surface to apply the papier mache. First I bulked up his body and then I taped on his legs and bulked them up with paper as well. I tried to make him look as 3D as possible: I didn't want him to look like he was made from 2 flat pieces of cardboard, although that is totally a design decision.
Here he is, covered with paper and tape, ready for the papier mache. My friend Ann was creating an ox right behind him.
Next you need paper for the papier mache. While newspaper worked great for the bulking up part, it gets super messy when you are using the paste and the newsprint starts to get all over the place. So we went to our local newspaper and purchased an end roll and it was only $3! It was a big roll and we could have used it for the scrunching up part too but since I get the Sunday New York Times we are never wanting for paper in this house.
Cut the strips into manageable pieces. I found that I could cut straight down the roll with a utility knife and it created wide strips about a foot wide. Then I could tear them along the grain into strips and then tear the strips crosswise into easy to use pieces. Next, you need your GH-57 Universal Wallpaper Paste. I use it straight from the container. I don't thin it with water at all. Be sure to wear gloves. I pour it into a plastic salad container I have saved and then dip my fingers into the paste and then cover the paper. DO NOT DIP PAPER INTO PASTE. This makes the biggest mess and you end up using way too much paste.
Note: some people like to use flour and water and that is fine and great with kids. Wallpaper paste has anti-fungal chemicals in it which is great when applying a couple coats at a time like I do. Again, make sure you wear gloves!
It helps if you have a good studio assistant.
Cover your entire piece with strips slightly overlapping and, if possible, all going in the same direction. That way it will be easier to lay the next layer and know how much you have done. Try to smooth the paper out flat and get out any air bubbles. It's best to do only a couple layers max at a time and let it dry before the next layers. I did about 7 layers. I wanted him to be very sturdy.
Now I made him for the Chinese Moon Festival here in Tacoma so I wanted to decorate him with Chinese style patterns. After looking at some designs, I settled on a combo of the 2 designs on the left.
I painted him with a base coat of 2 coats of exterior latex paint and then drew free hand right on the sculpture.
Then I used artist acrylics and an angled detail brush to paint in the design.
I love how he turned out! All in all only about $20 worth of materials for a four foot sculpture!
Thursday, September 13, 2012
Making A 3D Papier Mache Animal Sculpture: Part 1
It seems for an art and crafty blog, my programming has been more eating and pets lately so I am going to try and get some art stuff back into the mix!
I've been asked by a friend to make a large, 3D sculpture of an animal in the Chinese zodiac to be carried in a boat parade during the opening of the new Chinese Reconciliation Park here in Tacoma. About half the animals were already taken so I chose dog from what was left over. It seemed appropriate to my life right now. They need to be about 4 feet tall/wide and light weight enough to carry on a dragon boat. I have no idea how they are actually going to be used. I will find out on September 29th!
First, I started by researching the Chinese Zodiac and printing out some dog examples. (see above) I decided I didn't want the Pomeranian style dog so I went with a little more stereotypical, yet stylized, dog. But he's a happy dog.
I drew him on a one inch scale and then roughly transferred him to a one foot scale on cardboard. My friend Kim is also working on this project and she gets giant heavy duty bike boxes from her husband's work. Handy.
I cut out 2 body silhouettes because a) it's supposed to be 3-D and b) we need to have a tube in his body for a stick to hold them to go inside. The one at the front of his body is just to balance it out. I bought a long piece of plumbing pipe at the hardware store and then just cut them to size with a hack saw. I used heavy duty adhesive to glue the pipes to the cardboard and taped them down to hold them in place while drying.
Next, I applied glue to the tops of the pipes and set the top cardboard down and weighted it with books.
Good to know my art history textbook from college still has its uses! The tail is not glued in yet, I just set it there for looks.
Next part I will be attaching the legs and tail and then bulking up the body to make it 3-D. It's fun to do these big arty community projects.
Monday, April 23, 2012
38 Things: Make a Coffee Table (A Bowling Pin Coffee Table)
We have desperately needed a coffee table since we moved into our house nearly 6 months ago. (can you believe it? Six months? Wow, time goes by fast!) Instead of buying something, I decided on my list of 38 Things I Want to do Before I Turn 39 that I should make something. I don't like having a house full of furniture that looks like a showroom. I know I can't make it all, but I like to have funky, one of a kind character pieces in my house to liven things up.
First, I sourced the butcher block top from a piece of IKEA furniture we bought for the kitchen. We combined 2 island tables together with one large counter and this small one was left over. Next, I realized I had a whole bunch of bowling pins collecting space in the garage and thought they would be perfect for legs. Then I didn't do anything about it for 2 months until I convinced my friend Patrick to help me with attachments.
We cut 5/16th steel all-thread from Home Depot into 5 inch lengths. Then we used a drill press (OK, Patrick used the drill press; I watched) to drill approx 2" through the top layer of plastic and into interior made of wood. Next we threaded the all-thread into the bowling pins. We did this by screwing on 2 nuts on one end of the all thread and then using a wrench to twist it into the pins. Then I cut the all-thread lengths to 1 1/2"--that was enough to go through the block and washer and have enough room to be screwed tightly with the decorative brass nuts. A very helpful man at Ace Hardware helped me to figure out the best hardware to use. Finally, I worked out what pattern I wanted the bowling pins to be, drilled the holes and then assembled the whole thing!
It only took a couple of hours. The pins are a tiny bit wobbly and so we might make a triangular base for each end to stabilize them. But I needed it finished since I was hosting my book club last night and it worked great to hold our books and drinks!
Wednesday, March 7, 2012
Practice Makes Perfect
On 2 different recent occasions I was told by lecturing artists that when I make something I like, I should make 10 more of it or make one every day for a month to perfect my skills and see where I want to take it.
I think this is a great and simple philosophy. All too often I fall into the ''what's next" trap and think I need to endlessly be trying new things. I am stepping back and letting myself concentrate on lattice scarves. (Of course I am also working on a ton of new dyeing techniques at the same time, but it will all balance out, no?)
The first lattice scarf I made had square edges and was 4 squares wide. This one is 2 squares wide but with fringe. I was so excited about it I took a photo before I had ironed it and snipped off a few lumpy bits, but I really love how this one turned out. I purposely made the square holes larger so I can pull the scarf into itself which allows for a multitude of ways to wear it.
We are going on a cruise at the end of the month and I want to make a couple of spring scarves to take with me. Maybe one lattice and one extra large nuno wrap for when it gets chilly. Onward!
Wednesday, February 15, 2012
Making a Festive Garland
I made a fun garland for my Valentine's brunch the other day but you can really use any colors and make it for any time of year. Garlands are inexpensive, relatively easy to make (unless you try to take a short cut like I did--see below) and add a lot of punch to any decorations. The whole thing cost me less than $4.
I bought 6 sheets of 12" x12" card stock in varying shades of red to fuchsia. Then I took out my ink nib and pot of ink and went to town doodling and scribbling all over each sheet of paper. After they dried I turned them over and did the same thing on the other side. Now, you could easily use a big fat Sharpie as well but I really like the look of the pen and ink and it really didn't take that long.
Then I used a 1 1/2" punch and punched out my dots. I punched out the perimeter first and then cut off those bits and punched out the center, etc. I ended up with about 200 circles.
Finally, you need some ribbon to attach these to. On past garlands I use a little thicker ribbon and sew all down the length of it, adding a circle every 5-6". But this time I bought a little too skinny ribbon and I knew it would take a long time to sew along it without breaking the thread so I decided to be a clever monkey and staple them to the ribbon. Bad idea!!!!! First, I nearly gave myself carpal tunnel squeezing that stupid stapler 200 times and second, the ribbons immediately get tangled upon one another the instant they even barely touch. What I should have posted was a photo of my husband patiently untangling 6 different lines of garland for 1/2 hour.
See, I should have just done it the correct way to begin with. But I am not throwing them out. I am wrapping each one individually around a piece of cardboard to stop the tangling issue. But be smart and sew them and save yourself the hassle!
Thursday, December 29, 2011
When Your Eyes Are Bigger Than Your Stomach
What do you call it when you try to quickly make a little craft project that turns out to be a lot bigger and more time intensive than you thought it would be? Your eyes are bigger than your craft?
Anyways, last week for our dinner party I made a hand painted table runner that turned out pretty neat. But it was not my original idea for a table runner. I have a lot of felt fabric I bought way back to make felt flower pillows and I thought I would take the left overs and make some neat cut out designs.
I used a Sharpie to draw out the design and an Exact-o to cut it out. Only it takes f-o-r-e-v-e-r. I couldn't find my blade cutting mat and so I used a wood drawing board. Big mistake. The wood dulls the blade quickly and gets little splintery bits of wood all over the fabric. Also, the fabric is pretty stretchy so you have to hold it down very firmly when you cut. Below is all that I had cut out after watching 2- 2 hour plus movies! (I probably was watching the movies more than cutting, but still, it took a while.) Since the dinner party was drawing so near and I was still so far away from completion, I set aside the project.
However, I love how it looks and want to go back and finish it once I find my cutting mat. I also like how the gray looks on top of the green and am wondering about stitching down the gray to an un-cutout piece of felt. Lots and lots of possibilities and very simple to do! Just get a good cutting mat and I think it I could find stiffer industrial felt it would be even easier.
So little time, too many things to do in this universe.
Subscribe to:
Posts (Atom)