Remember when I spent all those back breaking hours making my baggie trades? (Heather remembers too, she helped me one whole day and I still owe her something for that.) Well, the pay off came. And came and came and came.
The first night at Artfest, in the Commons before dinner, everybody begins to trade like mad. I barely saw what I was trading, it was so crazy. I didn't even get a good look at everything until I got home and was able to lay everything out on the dining room table.
This little felted ball, from lovely Lori in Helena, Montana, is one of my favorites.
I was quite enamored by the several felted objects I received. Maybe because I don't felt, I think this is just the neatest thing on the planet.
This hand painted little gourd is pretty unique.
Lots of sweet little charms too.
This domino came in a bag with some papers for collage, but I just love the heft of this, you can tell it's old. About a third of the trades were materials for you to do your own thing with. I appreciate that.
I really, really liked this crow charm too. I am definitely going to be putting that on a necklace.
Far too many things to show, but my advice to any would-be Artfester is that is you had to pick between doing the Fat Book and the trades, do the trades! You get to meet all the people you exchange with on the trades, the Fat Book just shows up all done and you don't have any faces to connect to the pages. Plus, now I am even more inspired to work with these little goodies!
Photos of my Fat Book coming next!
Wednesday, March 31, 2010
Tuesday, March 30, 2010
Art Fest: Showing Off the Work
The last night of Artfest, they have a show off your work session where anybody can put out anything they worked on or made. These are just a few of my favorites.
Besides the classes, this was my favorite of the activities. It was really fun to see what people came up with. That horse sculpture is amazing.
I also liked the range of styles. Steampunk to abstract to realism, it was all here. Hundreds upon hundreds of items, I couldn't get to photograph them all.
That octopus lamp is made out of the same hog gut as my Cyclops bird. (see post below for more on bird) It looks like tissue paper.
This big bird painting/collage was awesome too. I talked to the woman that made it and she said she was about to give up on painting and then she made this and now she's changed her mind. Nice.
Keeping it real. Here is me looking like ass after 4 days of little sleep, poor showers, and no make-up. Yech!
Monday, March 29, 2010
Home From Art Fest
I am home from Artfest 2010 up in Port Townsend and I am FREEZING. While I was gone, my husband let the heating oil run out. (I am pretty sure I warned him to order heating oil. He says I told him nothing.) We had the tank refilled today, but when it runs itself out, it usually clogs the intake hose because all the grit at the bottom gets sucked in and then it stops working.
So now we are waiting for the furnace guy, Dave, to show up and do a little maintenance. Dave is a funny guy. He's worked on this furnace for years and I think he really hates having to come to our house. He's really large and our furnace is under the house and he has to crawl into our crawl space to work on the beast. It was pouring rain all day but at least now it has mostly stopped and so he won't get super muddy. But my hands are so cold, I really want to crank the heat.
That's my excuse for not posting up all my cool Artfest stuff today. Fingers are cold, don't want to work. And I have some fun photos to show.
When you go to Artfest, you take 3 days of art classes up at Ford Worden in Port Townsend. You sleep in the old navy barracks and they provide meals and extra activities at night as well.
I had never been to Artfest and I was going by myself and didn't know anyone that was going to be there. I picked out my classes based on technical learning--which classes would teach me the most skills to experiment in my work later on? It was a tough decision. In the end, I took a metal charm mold making and casting class, a class learning to deconstruct decorative tin cans and use eyelets and punches to create jewelry and assemblages, and a class using wire sculpture and hog casing.
Yes, you read that right, hog gut, the stuff they stuff sausage into. This is a vat of it that we took strands out of for making our work. It's pasteurized and packed in salt and it didn't exactly smell bad, in fact it made the whole room smell a little like wet dog. One person in the class was pretty disturbed about using it. (We were warned ahead of time that the class was not for the squeamish.)
It comes as a tube (obviously) and you slice it open and spread it out and cover your sculptures. It shrinks and tightens as it dries. It doesn't like to stick to stainless steel, so I had a challenge getting this cyclops bird covered.
I like the idea of using a natural material to cover my sculpture, but this stuff does deteriorate, so I am not sure if I will be using it a lot in the future. It does have a lovely translucent look.
I played a little with ink stains.
Oh, good, the heating guy is here. Now if we can get some heat, my frozen fingers can thaw out and I can get some more posts up!
Tuesday, March 16, 2010
Artfest 2010 Trades
I am heading to Artfest next week and I am getting very excited. Imagining 550 plus creative people in the same area for 5 days sounds pretty exciting. I am collecting supplies and making many lists. One item I have delayed on a little while is the trade I am going to bring.
Trade as in trades as in 100 plus handmade goodies you bring to trade with other Artfesters. Now, it is not a requirement by any means, but it is highly recommended on the message boards as a way to meet people and get your name and website out there.
I did some Googling to see what other people had done in the past and a lot of it seemed like little charms, or magnets, or pins. I don't really have a small, signature item that I make that would be appropriate and besides, I think if I tried to make some small pin they would end up mediocre anyways and nobody would remember me.
So, I was wracking my brains, trying to think of something to bring and I thought, "ah ha!" what about something to put all your little trades into? I am good at making little drawstring baggies with linings. Even though I have oodles and oodles of fabric (it's a serious problem of mine, collecting fabric), I had to go to the fabric store to find stuff more appropriate to the fairy tales theme.
I started to experiment with different sized baggies.
I also decided I wanted to try and do some iron-on transfers. (That's one of my 36 Things To Do Before 37, so I might as well kill two birds with one stone, yes?)
Only problem, is I am not sure I like the dark gray fabric I picked out (and I have a lot of it) I actually like the backing, the light gray side better.
What do you think? I have so many ideas swimming in my head, it is hard to chose! I have started cutting out fabric and ribbon and printed all the iron-on sheets I need, but I can't decide on the gray.
I am hoping to make 100 of these in the next 5 days, we'll see what happens! But I think they will be memorable trades and quite different from everything I am seeing so far.
Monday, March 15, 2010
Quick and Easy Baby Blanket
I've never been that interested in babies. We have mostly surrounded ourselves with baby-less friends, but when that occasional friend or cousin (my cousins are serious breeders) have a baby, I want to send them a gift but I am usually flummoxed about what baby sort of thing to buy.
About 10 years ago I was having this baby gift dilemma and I think it was my sister Holly's idea to create a baby blanket out of a piece of fleece.
And it was easy but it looked sharp.
So this has been my go-to gift for babies for the past 10 years. I have made a lot of these blankets. The nice thing about them is that they can be used for many years and thrown in the washing machine. One year I made a whole bunch of them at Christmas time for a women's shelter.
Start by buying a yard of interesting fleece. Cut off a foot on the long side to make it a little more square. Or you can just keep it rectangular, but I like it to look more square. Also pick out coordinating embroidery floss. I love looking at all the colors on the floss aisle. You only need 2 per blanket. Notice that I bought 3 for each blanket and now I have left over. I do this every time for some reason.
I have a big sewing basket but I also have my cigar box that is easy to carry around the house. I bought it at a yard sale years ago and just love it.
It perfectly fits a pair of scissors, my rotary cutter, pins, embroidery floss, tape measure, and needles. I love my Sewing Susan needles.
But for this project I needed my larger embroidery needles.
Cut a couple arm's lengths of the thread you want to use and separate the floss in half so you have 2 lengths of three strands each. I'm not sure why I always divide the floss strands. I think my mom taught me to do that and it is one of those things I have been doing ever since.
I don't like to start on a corner; I start about 6-8 inches in from a corner. Decide which way you want to work. I work from left to right. Tie a knot about an inch down from the edge because you are going to roll the edge down twice.
Start by folding down the edge and then fold it again. You get a nice roll.
Then just wind the thread around the roll and come through the back and keep going.
It's pretty darn easy, sorry to insult your intelligence with explaining how to make a roll.
The corners are trickier, but just barely. I usually trim a little off the corners before rolling them so they won't be so bulky.
For some reason, these blankets make me so happy. I just love the wobbly edge and the texture of the finished edges. It can be very meditative to just sit and work on these blankets. This one took about 2 and a half hours to sew.
I know you can buy something similar at IKEA or Target for barely nothing, but usually the colors are boring and they are made in China. (Although I am sure this fleece is from China too!) But this looks so handmade and cozy.
Thursday, March 11, 2010
Power Food
Quinoa is a very interesting food. The ancient Mayans ate it. It's not a grain; in fact, it is in closer relation to spinach and beets than it is to wheat! So being gluten-free is nice, but it is also high in protein and contains a complete set of amino acids, making it pretty darn amazing.
The only thing tricky about it is that if you buy it in bulk, you have to rinse it first. It has a slightly bitter coating on the outside of it called saponins that easily rinse away. If you buy it in a box, it comes pre-rinsed.
Besides being a fabulous superfood, I personally like its fluffy texture and mildly nutty taste. You can serve a stir fry over it or eat it for breakfast with maple syrup and dried fruit. I also like to make salads with it.
This is my go-to salad when the fridge needs to be cleaned out the night before our farm veggie delivery. You could easily substitute tuna for chicken or use chicken thighs instead of breasts and add all sorts of vegetables.
Yogurt Curry Quinoa Salad with Poached Chicken serves 4
2 cups quinoa, rinsed
1/4 head red cabbage, shredded and chopped
1/4 head savoy or green cabbage, shredded and chopped
1/2 red pepper, diced
1/2 red onion, diced
2-3 carrots, diced or shredded
1 zucchini, shredded on box grater
2 0r 3 green onions, minced
handful cilantro, chopped
2 chicken breasts, boneless and skinless
2 cups lowfat, plain yogurt
1 tablespoon of your favorite curry powder
squeeze of lemon
salt and pepper to taste
Combine 2 cups rinsed quinoa with 4 cups water in saucepan. Bring to a boil. Cover, reduce heat to simmer and cook for 15-20 minutes or until most of the water has evaporated. Allow to cool a little.
Meanwhile, place chicken breasts in another pan, fill with water until chicken is just covered. You may use a little wine here and throw in some dried or fresh herbs if you like. I added some smashed garlic cloves and a teaspoon of zatar, a middle eastern mixture of thyme and sesame seeds. Bring to a low boil and cook until chicken is firm, 15-20 minutes. I cut into the chicken after about 15 minutes to check for doneness. Drain chicken and cut into 1/2" chunks.
Combine yogurt with curry powder, lemon juice, and salt and pepper and then combine with the chopped vegetables. Add chicken and quinoa, toss thoroughly to coat with dressing and serve!
Wednesday, March 10, 2010
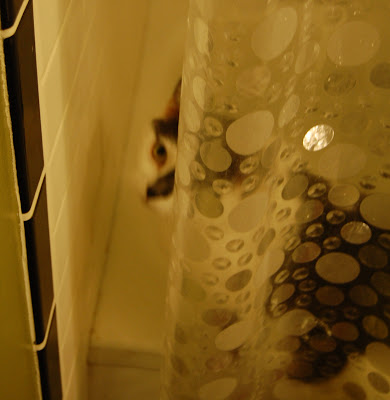
There's a Weirdo in the Shower
If you haven't figured out by now, we are cat people. I sometimes wish we were dog people, but that will not happen until one of our three cats moves on. It's actually more like we are special needs cat people. (Meaning our cats have special needs, not us.)
We have one cat that is a runty whiner (Mr. MoneyPennny), an obese cat that is a little bit of a scaredy cat and bully at the same time (Vincent), and one that loves to get in the shower with you (Sack Cat).
I am not kidding. She also loves it when I put her in the sink and give her a wash down.
And she loves to get in between the two shower curtains when you are taking a shower and meows at you. I know, weirdo.
But she is so darn cute!
Monday, March 8, 2010
Air Drying Clay: Troubleshooting Problems
OK, I have been having a lot of fun working with air drying clay, but I have come up against a couple of problems.
First, it dries out very quickly. As there were no directions on the package, I was just winging it, and assumed it would be bad to add water to the clay, afraid I might weaken it. Several discussions and how-to's I viewed online today all suggested using water to help soften the clay, but I am still wary.
Second, as it dried, I got quite a few cracks. Not so bad on the Raven, just around his skinny legs.
Far worse, and more visible, on the Dachshund sculpture.
A few of the smaller ones I knew I could just fill with paint, but the larger ones were a little more troublesome. So, I pulled out my handy Durham's Rock Hard and filled in the gaps. If you haven't seen this stuff, it's amazing. Just add a little water and it will patch anything! You can even cast with it, but it is not so cost effective.
I think I could solve the cracking problem if the pieces dried slower, so I am going to make another one and wrap it in plastic when I am done with it and see if that helps.
Repaired and now crack-free sculptures:
I am not entirely finished with the paint jobs but I was running out of daylight and wanted to get some photos. I have to add some more detail to the Raven and then I want to put a glossy medium over both of them.
Subscribe to:
Posts (Atom)