Sunday, February 28, 2010
Work In Progress: 36 Things: Paint a VERY LARGE Canvas
When we went to the UK and France a couple years back, I spent a lot of time visiting museums. The Picasso Museum in Paris was one of my favorites along with the Pompidou Center (also in Paris)l. One thing I kept noticing was how large so many of the paintings on display were. Did you have to create giant paintings to get noticed and shown? Apparently so.
When we came home, I was determined to paint a large painting. I even went out and bought a large canvas. OK, it's not gigantic, but it is 4 feet tall by 5 feet wide, plenty big.
This large canvas, however, languished in my studio for the last year. To add incentive for myself, I added "Paint a VERY LARGE canvas" to my list of 36 Things To Do Before Turning 37.
I am having a show in June and realized I really, really, want to finish my VERY LARGE canvas for this show. But with a twist, because I am going to document my process. Sometimes you paint and paint and paint and the finished product looks nothing like what you started with.
I have been thinking about this painting for the last couple months and I do have a vision of what I want to do. We'll see how close it comes out to my original thought. The photo above is the painting after the first session in my studio.
I started by spray painting the background and then painted on the Raven in acrylic. Next, I started working in these dots, which I made by printing with the end of a wine cork. I plan on working on it everyday this week and will take more photos as I move along.
Goodie Giveaway Winners!
I have 2 winners for my goodie giveaway! (I can't choose randomly on my own, so I go to random.org for all my giveaway numbers.)
The first winner, based on those who told me who their favorite president is and who receives the painting of George Washington is Ann! Congrats Ann!
The second winner, picked out of all my RavenMeetsCrow fans on Facebook and who will receive my little blank book with the owl is Wendy Sonnemann! Congrats Wendy!
Thanks to everyone who participated and who became a fan on Facebook!
Friday, February 26, 2010
Fruit and Veggie Home Delivery
We are always trying to find more ways to be healthy and be nice to the environment at the same time. One debate I have been having with myself is "local or organic?" A lot of people believe eating all organic is the best way to go. I have a hard time justifying organic grapes if they come to me all the way from Chile.
For a couple years, we belonged to a C.S.A. (Community Supported Agriculture). This meant that we paid a certain amount upfront to a local, organic farm each quarter and then we were guaranteed a portion of their crop. This had a few problems. One, I had to drive out to Puyallup every week to pick up our share. Two, this took a lot of time as you had to bag up your own goodies and a lot of the produce was barely cleaned. Three, while I enjoy winter squash and celeriac, they got pretty old week after week after week. So we gave up on the C.S.A., and tried to satisfy ourselves with going to the farmer's market. The problem with that is to actually remember to get to the farmer's market.
Finally, however, I think we may have found a solution: Terra Organics.
This is a farmer owned group that delivers organic produce right to your house every week. They just drop the box off on your doorstep and you leave the empty box for them to pick up. You can pick a small box (that's what we did) or a large box, and they can either be local or not or veggies only or fruit only or a mix plus there are a ton of add-ons.
This first week I just signed up for the normal small box. It's only $25. But this is where my dilemma kicks in: local or organic or both? This week's box included oranges and blueberries and even a mango(!) but they are from Mexico. So I decided to switch and next week's box will have Pacific Northwest grown items only. Maybe we won't get a mango, but our food won't have come from over 1300 miles away!
Wednesday, February 24, 2010
Happy Hour Any Hour
Whenever we go out to a fancy dinner, we like to start with a little bubbly. It is festive, and gets you ready for whatever else you are going to eat and drink. We especially like Champagne Cocktails. Supposedly these were one of the first cocktails ever invented--they drink them constantly in the movie Casablanca but who knows if this is the original recipe, really. Only very fancy bars make these as you have to have sugar cubes on hand, but it is a very simple recipe and will charm the socks off anyone you have over.
Champagne Cocktails
For 2 servings you will need:
2 Champagne flutes
2 mini bottles Champagne, Prosecco, or other sparkling wine.
sugar cubes
bitters
lemon rind
Most of you probably know, sparkling wine can only be called "Champagne" if it is from that particular region. Italian sparklers, Proseccos, are just as tasty and usually cost less.
Place one sugar cube in each flute. I love sugar cubes, so elegant looking.
Pour enough bitters over sugar cubes so you don't see any white anymore. Don't worry, the finished drink is not bitter!
Slowly pour bubbles to almost fill glass.
If you are serving from the mini bottles, there will be some left over and you can serve it on the side with the drinks.
Add your twist of lemon rind, and serve!
Last summer we had a wine party but just drank Champagne cocktails and French 75's (that's champagne and gin and that recipe is for another day.) Now THAT was a fun party!
Friday, February 19, 2010
Time For A Giveaway!
I've been feeling the love from a lot of giveaways lately, so it is time to return the favor.
I wanted to do a giveaway a couple of weeks ago but everyone and their mother seemed to be doing a giveaway for Valentine's Day, so I decided to wait until a really, really important date to celebrate: George Washington's birthday. OK, this day already has a special place in my heart since it also my anniversary, which we purposely did on George's birthday because, well, we are a little weird that way.
Any hoo, I have two items to give away in honor of George.
One is a painting of George:
The other is a little blank notebook that I painted an owl on:
There are two ways to win.
One, leave a comment on this posting telling me who your favorite president is and why. (If you post it on your blog you get 3 entries! Just be sure to let me know if you do.)
Two, fan my etsy shop, RavenMeetsCrow on Facebook and one winner will be selected from there as well. (If you comment on my Facebook page what your favorite bird is, and why, you get 3 entries there! Have fun and thanks for playing!)
I will announce the winners on Feb 28th!
Thursday, February 18, 2010
A Gift in the Mail!
I was surprised and very pleased to win another blog drawing last month! (You have to enter a lot of giveaways to win one or two is my personal experience.)
And just when I had forgotten all about it, I received a note in the mailbox yesterday that I had to go sign for something at the Post Office. It had completely slipped my mind that it was coming and so I was more than a little perplexed when I went to the big industrial mail center to receive my mystery package.
But once I got a glimpse of the fabulous envelope, I remembered!
The wrapping was fantastic!
I had won a miniature leather journal from TeoStudio! It is absolutely magical looking.
He is based out of Portugal and makes these amazingly beautiful journals and was having a giveaway on his blog. But you can find most of his work at his Etsy shop.
I was a pit more perplexed why it was shipped from Bucharest, but then I read his blog and it sounds like he likes to go there on shopping trips.
This little gifty has reminded me I need to put up my newest goodie giveaway...I have been working hard on two gifts to hand out this week, details coming tomorrow!
Tuesday, February 16, 2010
Science of Art at the Museum of Glass
A few of you already know that I recently started working at the Museum of Glass here in Tacoma as the artist in residence in their Education Studio. I am working with students of all ages that are part of the museum's Science of Art Curriculum. They are studying the science of sound and glass and so I proposed making wind chimes with the students.
There was quite a bit of prep work getting everything ready. Those are just plain old zinc washers from Tacoma Screw.
It was tricky trying to incorporate glass with the kids since we don't want them to mess with anything dangerous, so I stuck to glass beads and also had wire wrapping for the older students.
I like to wrap things in wire.
I had to make a few samples to make it sure it all worked.
The quiet before the storm:
(By the way, there is a lovely recycled plastic installation by Barbara De Pirro hanging in the windows and around the column.)
Busy at work:
A few of the teenagers, of course, were a little too cool to take the project seriously, but I think most of the students enjoyed working on something creative.
I am really liking everyone I have met that either works or volunteers at the museum. I am also loving that they let people wear jeans. When I volunteered at the zoo I had to wear khaki, ack!
I'll be doing this every other week for the next 6 weeks, fun!
Monday, February 15, 2010
Lie Like a Rug, Part 2
I didn't really think there was any way the snowy weather on the East cost could affect my life at all. Until I ordered my Flor tiles, that is.
And waited.
And waited.
And waited for my lovely little carpet squares to arrive in the mail.
I was very surprised today when they finally came via UPS. I thought no one was delivering on Presidents' Day. Obviously UPS is above such trivial holidays.
Well, I love how they look but I think I might want to add more, like a half border. I'll just live with them for a bit and then decide. They are a tiny bit shabbier than the original, single sample I purchased. Yet once I put them all together (in a snap, by the way) I didn't notice the shabbier ones at all.
The cats certainly like them.
Mr. Moneypenny likes to practice his yoga on them.
Whereas Vincent was a little confused about where the old rug went.
Sunday, February 14, 2010
Mardi Gras King Cake
So our wine tasting group got together last night at Paul and Sue's house this month and instead of having a Valentine's themed party, they decided to go with a Mardi Gras themed party. Celebrating Mardi Gras is not such a big deal in the Pacific Northwest. (I guess we don't really feel the need to get our party on before Lent.)
Our wine tasting focused on Pinot Noirs and I am not such a big Pinot fan, so I can't remember much about what I tasted. I did like one Chilean Pinot, but the name escapes me completely. However, the food was great!-- It was a nice treat to eat Jumbalaya, dirty rice, spicy Cajun slaw and Greg's delicious Muffalettas. We also dressed up in festive clothing with lots of beads. I decided to make King Cake.
I got this recipe straight off the YumSugar site. It looks complicated but it is pretty darn easy and it was a big hit since it isn't super sweet and tastes more like a cinnamon roll than cake. I opted out of the yellow sugar, though, and did blue instead. I thought it was more esthetically pleasing. As you can see, it made a big mess on my counter!
Happy Valentine's Day and Chinese New Year and Mardi Gras!
Friday, February 12, 2010
Experimentation with Beads
So the other night, Wednesday, I was going to meet Trevor downtown at the New Frontier to watch Pecha Kucha (a sort of artist and designer meet and greet with slides) and have a drink but first I had to wait for UPS to show because we were expecting a shipment of wine from Walla Walla. And UPS insists someone over 21 be home to sign for it. A pain, really, as they said it was going to be delivered the day before and I waited around between 4 and 6:30 and it never showed up.
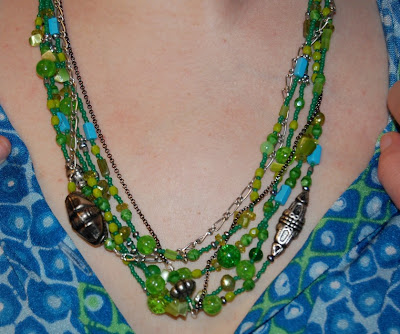
I had a couple of hours to kill and I didn't feel like doing anything productive like cleaning my office or working on our taxes. Instead, I decided to make a bead necklace to match the dress I was wearing that evening.
Not entirely sure if it is finished, but the wine showed up and I put it on and ran with it.
P.S. The wine shipment was from Otis Kenyon, we are members in their quarterly wine club, and man, if you like big juicy reds, they are worth tracking down and trying some. I think their Carmenere is on my top 10 list of most delicious wines I have ever tasted.
Monday, February 8, 2010
Fat Book, Finally!
OK, at long last, I have completed my fat pages for the Artfest Fatbook, and I am very pleased with how they turned out. Working with the fairy tales theme, I designed a Goose That Laid the Golden Egg page.
The story as taken from Wikipedia:
A man and his wife had the good fortune to possess a goose which laid a golden egg every day. Lucky though they were, they soon began to think they were not getting rich fast enough, and, imagining the bird must be made of gold inside, they decided to kill it. Then, they thought, they could obtain the whole store of precious metal at once; however, upon cutting the goose open, they found its innards to be like that of any other goose.
I added my own opinion on the back of the pages as to the moral of the story:
Do not give in to the temptation to be inappropriate to the moment.
However happy with my theme, I was stumped last week, not liking the direction I was going; all the time I spent on the blue fronts was not really working for me.
So I went outside and spray painted some stencils on the front. Still not satisfied, I painted the backs of the pages with acrylics and then spray painted them as well and when I came inside to look at them and start with making all of the little geese and banners, I realized what my problem was. I didn't like the blue with the geese and the banners. The back colors I had chosen were much more complimentary. So I turned them over and the fronts became the backs and the backs became the fronts!
I also realized I wanted a more three dimensional egg, so I used those little gold brads used to hold office paper together.
Whew! That's a lot of pages. I am mailing them today.
I can't wait to get my fatbook at the event and see what the other 49 other artists created!
Sunday, February 7, 2010
Sweet Potato Pot Stickers plus Using Leftovers
Two things I love in this world, together, at last. Pot stickers seem complicated, but they are easy to make and will impress everyone. They do take a little time to assemble, but that is the really the only hard part, the time it takes.
I made up the filling as I went along, so feel free to substitute or modify as you see fit.
Sweet Potato Pot Stickers
(This provides a lot of leftover sweet potatoes.)
3 sweet potatoes, peeled and cut up into chunks You can use either the white or orange variety.
1/2 red onion, finely chopped
3 Tablespoons garlic, minced
1 teaspoon plus chile paste
3/4 cup crimini mushrooms, finely chopped
1 handful chopped cilantro
1 12 oz. package round wraps
oil for saute
dipping sauce: mix 1/4 cup rice vinegar with 1/4 cup soy sauce. Add 1 teaspoon chile paste or red pepper flakes if desired.
special equipment: skillet with a lid- if you don't have that, you can boil them first, then brown them.
Peel and chop your sweet potatoes. The smaller the chunks, the faster the cook!
Bring a large pot of salted water to boil. Add sweet potatoes and cook until you can mash one with the back of your fork. Drain, and mash.
Meanwhile, chop your red onion, garlic, and mushrooms.
Heat a film of oil over medium in a skillet and add onion; cook for 5 minutes. Add mushroom, garlic, cilantro and chile paste. Sambal Oelek is my go-to paste for nearly everything. Added to a dish, it's not as spicy as you think and adds loads of flavor. Cook until mushrooms are tender.
Once onion mixture is cooked, remove from heat and stir into mashed sweet potatoes until thoroughly combined. Wipe out skillet.
Time to assemble the pot stickers. You can buy square or round wraps, but the rounds are best. In my grocery store I find them in the fridge section with the jalapenos and mushrooms.
Have a cup of water handy.
Start with one teaspoon centered on one wrap.
Moisten the edge of the round with your finger dipped in that handy glass of water. Fold in half to make a crescent and press down edge. You can make little pleats as you go. Set them on a plate as you make the rest. Try not to let them touch each other on the plate too much or they might stick.
Ready for cooking.
I made these with two different methods to speed along the cooking time. In one pan, I heated water to boil a third of the pot stickers. I cooked the rest in my skillet, in two batches.
Start the skillet method by heating a generous film of oil over medium heat. I prefer canola oil.
Add pot stickers to pan; flat sides down. It is okay to crowd them a little. Let brown for 2-3 minutes.
Add 1/2 cup water to pan and cover with lid. Steam for 7-10 minutes, or until water is nearly evaporated. My skillet is steaming in the front, the pan in back is boiling. If you are using the boiling method, boil for 7 minutes and then drain.
Once water in skillet has evaporated, add another teaspoon or too of oil to pan and brown a little more. This is to help unstick them from the pan. Do not turn over pot stickers. Is this how they got their name? I do not know these things. I just know they are delicious. Serve with your dipping sauce.
If you have 2 skillets, it will go much faster. If you boil the pot stickers, you can pat them dry on a towel and then brown them in a skillet.
Taste tasted, husband approved, the skillet browned and then steamed were far superior to the flat out boiled pot stickers. They are the nice crispy ones on the front of the plate.
As you can see here, however, all pot stickers were consumed.
Now with the above recipe, I only used half of my sweet potato mix because I was only feeding the two of us. If I had been having a party, I would have marched on and made all of the pot stickers.
Instead, the next day I used the sweet potato filling in quesadillas with cheddar cheese and avocado. Delicious.
Subscribe to:
Posts (Atom)