Showing posts with label tutorial. Show all posts

Tuesday, March 25, 2014

A Painted Lampshade

 A couple of months ago we finally bought a new sofa.  We had been living with a small, beat up leather sofa for the last 10 years and while it worked in our old house, it was far too small for both the living room and for us.  We upgraded to a sofa that could fit both of us and the dog and the cat, all at the same time!  

But I found I wasn't using the new sofa much.  Instead I would curl up on one of our small arm chairs with ottoman across the room.  I realized it was because I had no proper reading lamp for the new sofa.  And much of the time I spend in the living room I am reading.  We weren't sure what kind of lamp to get (another decision!) and then some friends of ours came over and offered to give us a big modern lamp that didn't work in their house anymore.

Yay!  It fit perfectly!  But there was only one problem.

Monday, February 3, 2014

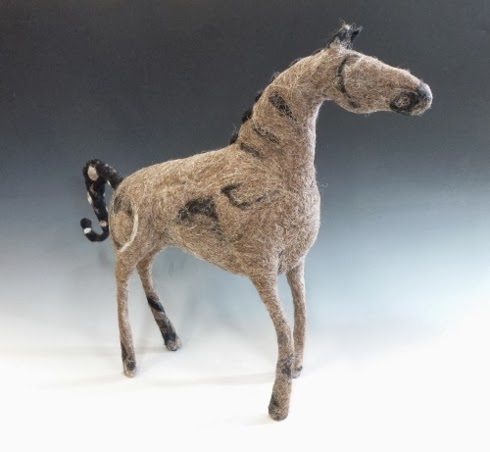
Year of the Horse Needle Felted Sculpture Tutorial


This is now the Year of the Horse, according to the Chinese calendar.   Chinese New Year is a big deal here in Tacoma,  Every new year (this year it was January 31st), a group of super secret glass artists distribute and hide 100's of glass spheres (Monkeyshines) all over the city.  I have never found one.  But then again, a lot of my friends get up at 5 AM to go find them and I come along 4 hours later and come up empty.  Oh well, one day I will find one!

Instead of a sphere, I decided to make a needle felted year of the horse sculpture.

Monday, December 16, 2013

Making a Holiday Tree: Part 2


Yay! I finally completed my handmade Seussical Holiday tree!  I started out by trying to make an all cardboard tree which I quickly realized was going to look bulky and maybe a bit amateurish so I took it apart and started over with more of a mixed-media approach.

Tuesday, October 2, 2012

Making A 3D Papier Mache Animal Sculpture: Part 2

Catch the first post in making a 3D animal here.

After I cut out the cardboard and placed and glued the tube inside my dog, I started to cover him with crumpled up newspaper covered with masking tape to make the bulk of his body.  I like completely covering it with tape because it makes a smoother surface to apply the papier mache.  First I bulked up his body and then I taped on his legs and bulked them up with paper as well.  I tried to make him look as 3D as possible: I didn't want him to look like he was made from 2 flat pieces of cardboard, although that is totally a design decision.  

Here he is, covered with paper and tape, ready for the papier mache.  My friend Ann was creating an ox right behind him. 

Next you need paper for the papier mache.  While newspaper worked great for the bulking up part, it gets super messy when you are using the paste and the newsprint starts to get all over the place.  So we went to our local newspaper and purchased an end roll and it was only $3!  It was a big roll and we could have used it for the scrunching up part too but since I get the Sunday New York Times we are never wanting for paper in this house.

Cut the strips into manageable pieces.  I found that I could cut straight down the roll with a utility knife and it created wide strips about a foot wide.  Then I could tear them along the grain into strips and then tear the strips crosswise into easy to use pieces.  Next, you need your GH-57 Universal Wallpaper Paste.  I use it straight from the container.  I don't thin it with water at all.  Be sure to wear gloves.  I pour it into a plastic salad container I have saved and then dip my fingers into the paste and then cover the paper.  DO NOT DIP PAPER INTO PASTE.  This makes the biggest mess and you end up using way too much paste. 

Note: some people like to use flour and water and that is fine and great with kids.  Wallpaper paste has anti-fungal chemicals in it which is great when applying a couple coats at a time like I do.  Again, make sure you wear gloves!

It helps if you have a good studio assistant. 

Cover your entire piece with strips slightly overlapping and, if possible, all going in the same direction.  That way it will be easier to lay the next layer and know how much you have done.  Try to smooth the paper out flat and get out any air bubbles. It's best to do only a couple layers max at a time and let it dry before the next layers.  I did about 7 layers.  I wanted him to be very sturdy.  

Now I made him for the Chinese Moon Festival here in Tacoma so I wanted to decorate him with Chinese style patterns.  After looking at some designs, I settled on a combo of the 2 designs on the left.

I painted him with a base coat of 2 coats of exterior latex paint and then drew free hand right on the sculpture. 

Then I used artist acrylics and an angled detail brush to paint in the design. 

I love how he turned out!  All in all only about $20 worth of materials for a four foot sculpture! 

Thursday, September 13, 2012

Making A 3D Papier Mache Animal Sculpture: Part 1

It seems for an art and crafty blog, my programming has been more eating and pets lately so I am going to try and get some art stuff back into the mix!

I've been asked by a friend to make a large, 3D sculpture of an animal in the Chinese zodiac to be carried in a boat parade during the opening of the new Chinese Reconciliation Park here in Tacoma.  About half the animals were already taken so I chose dog from what was left over.  It seemed appropriate to my life right now.  They need to be about 4 feet tall/wide and light weight enough to carry on a dragon boat.  I have no idea how they are actually going to be used.  I will find out on September 29th!

First, I started by researching the Chinese Zodiac and printing out some dog examples.  (see above)  I decided I didn't want the Pomeranian style dog so I went with a little more stereotypical, yet stylized, dog.  But he's a happy dog.

I drew him on a one inch scale and then roughly transferred him to a one foot scale on cardboard.  My friend Kim is also working on this project and she gets giant heavy duty bike boxes from her husband's work.  Handy. 

I cut out 2 body silhouettes because a) it's supposed to  be 3-D and b) we need to have a tube in his body for a stick to hold them to go inside.  The one at the front of his body is just to balance it out.  I bought a long piece of plumbing pipe at the hardware store and then just cut them to size with a hack saw.  I used heavy duty adhesive to glue the pipes to the cardboard and taped them down to hold them in place while drying. 

Next, I applied glue to the tops of the pipes and set the top cardboard down and weighted it with books. 

Good to know my art history textbook from college still has its uses!  The tail is not glued in yet, I just set it there for looks. 
Next part I will be attaching the legs and tail and then bulking up the body to make it 3-D.  It's fun to do these big arty community projects. 

Wednesday, February 15, 2012

Making a Festive Garland

 I made a fun garland for my Valentine's brunch the other day but you can really use any colors and make it for any time of year.  Garlands are inexpensive, relatively easy to make (unless you try to take a short cut like I did--see below) and add a lot of punch to any decorations.  The whole thing cost me less than $4.

I bought 6 sheets of 12" x12" card stock in varying shades of red to fuchsia.  Then I took out my ink nib and pot of ink and went to town doodling and scribbling all over each sheet of paper.  After they dried I turned them over and did the same thing on the other side.   Now, you could easily use a big fat Sharpie as well but I really like the look of the pen and ink and it really didn't take that long. 

Then I used a 1 1/2"  punch and punched out my dots.  I punched out the perimeter first and then cut off those bits and punched out the center, etc.  I ended up with about 200 circles.

Finally, you need some ribbon to attach these to.  On past garlands I use a little thicker ribbon and sew all down the length of it, adding a circle every 5-6".  But this time I bought a little too skinny ribbon and I knew it would take a long time to sew along it without breaking the thread so I decided to be a clever monkey and staple them to the ribbon.  Bad idea!!!!!  First, I nearly gave myself carpal tunnel  squeezing that stupid stapler 200 times and second, the ribbons immediately get tangled upon one another the instant they even barely touch.  What I should have posted was a photo of my husband patiently untangling 6 different lines of garland for 1/2 hour. 
See, I should have just done it the correct way to begin with.  But I am not throwing them out.  I am wrapping each one individually around a piece of cardboard to stop the tangling issue.  But be smart and sew them and save yourself the hassle!

Tuesday, February 7, 2012

Funky Wet Felted Bracelet Tutorial


 I have been playing around a lot this week in my new studio with an idea for my latest school project: Make a piece of wearable art as self portrait.  I have been coming up with a lot of ideas and while these candy looking layers of felt probably aren't going to make it to my final piece, I realized that they would be great as bracelets! 
All you need for this is just a few materials and the most basic of wet felting skills and could be done easily in an afternoon.  I wish I had known how to felt in high school.  I would have worn these up my arms like goth-girl gauntlets.   OK, let's get started.

You will need:
-approx. 3/4 oz wool roving in 2-3 contrasting colors
-tapestry needle
-elastic cord
-fabric scissors
-bubble wrap
-small amount of dish soap or olive oil soap dissolved in warm water.

 For one of my bracelets I used 2 colors.  The next one I decided to layer 3.  Lay out your bubble wrap and start laying out each color in overlapping shingles.  Each color should be at least 3 layers and make sure you alternate the direction of the layers or your piece won't want to felt properly. 

Try to be as exact as possible as laying layer upon layer.  The more whispy thin waste on the ends means the more you have to throw out when you cut it up.  

Here it is with the 3 layers.  I have pressed down firmly on each proceeding layer before I did the next one to help it all stay together.  

Ready to felt?  For something this small I don't bother putting a mesh over the top of the felt; I just press down firmly on the felt and gently pour the warm, soapy water over my hand to distribute the water.  Do this carefully: you want to keep your layers even and in place.  Slowly work around the whole rectangle of wool, pushing out air bubbles and making sure the entire thing is saturated with water.  The warm soapy water raises the PH balance and opens up the scales in the wool so the fibers will lock into one another. 

Once you get the whole piece wet go around the edges, rolling them gently so that you get a nice square(ish) edge. 

Now comes the felting and fulling process.  You can do the whole thing with your hands but I like to use some simple tools so my hands aren't in water all day long.  (You can see how puckered my skin is in several of the photos!)

Basically in the first stage you want to press up and down on the layers.  You do not want to rub the layers because as the wool is not felted yet you can move the material around and create thin spots.  So you can gently start by tapping on the piece with your fingers and gently with the palm of your hands.  I do this for a few minutes, gently turn the piece over and do it for a few minutes more.

Then I start to use some of my tools to help speed up the process.  Sometimes on these smaller pieces I just double the bubble wrap over on itself and then lightly tap it with a pool noodle.  Pool noodles are indispensable for wet felting. 

I will also lay a piece of rubber shelf liner over the felt, roll the whole thing up and then roll back and forth about 50 times before unrolling, rotating the piece, and then rolling up again and so forth.    Check periodically with a "pinch" test.  If you pinch the felt and you can pull it apart, it has not felted yet. 

When the piece has felted (meaning the fibers are sticking together) then next comes the fulling part.  This is where the fabric really locks together and the piece visibly starts to shrink and buckle.  At this stage I like to toss the wet soapy piece around on the table.  Start gently at first and when it is really starting to full you can get more aggressive with knocking the felt around.    You can also rub it on a washboard: the texture does wonders for fulling the felt.  Just make sure to keep it wet -but not soaking- with warm soapy water.

Once it has felted and fulled together to your satisfaction (with this piece, the more shrinkage, the better) thoroughly rinse the felt and then soak it in a cool water bath with either a couple teaspoons of vinegar or fabric softener.  I like to use fabric softener because it smells better.  Either way, this step is VERY important.  If you just rinse the soap out of the felt you do not rebalance the PH in the wool over time it can deteriorate.  (Maybe not so important with a crafty bracelet but very important with a nuno scarf that took you 5 hours to make!)  The vinegar or fabric softener also helps to close back up the scales on the wool making it smoother.  That's why you like the effects of it on your laundry.  Rinse out the vinegar or softener after about 10 minutes.  Then you can roll it up in a towel to dry but I throw it in the dryer with a load of clothes to really shrink it up.  Usually after drying is when you block out a piece.  This doesn't need that.  Also, watch out with the dryer on delicate pieces: sometimes you only need a tiny bit of time or you can shrink a piece too far.

As  you can see, it has now shrunk quite a bit! 

Trim off all the edges with your fabric scissors.  You should see a nice layered effect of your colors.  I also ironed it a bit to smooth out some bumps but that is purely optional.  

 Next, cut it into 1" strips and then cut the strips into roughly 1" squares.

Thread your elastic onto your tapestry needle.  I had to tie thinner floss to the elastic and then feed it through the loop because the elastic wants to fray.  

Gather enough squares to fit your wrist and your aesthetic fancy of how full you want the bracelet to look.  

The green one is using thinner squares and I only used 30.  The purple one is slightly thicker and I used 32 squares.  Play around with it until you are satisfied.  Tie a square knot in the elastic keeping it so it is not too tight when it is actually on your wrist or it can distort the wool.  Trim elastic so it can't be seen between the felt squares.  

Wear out to fancy dinner party and impress your friends!  I like how light weight they are.  Now I am thinking of using the same technique to make a statement necklace or cutting the squares into circles instead. 
I love playing with wool!

Friday, December 23, 2011

Simple Pocket Napkin Fold

 I love to dress up my place settings with cloth napkins.  I only have 6 napkin rings so when I host a larger party I stick to my old standby, the napkin pocket to dress things up a bit.

Start by ironing your napkins.  I know this sounds like a pain, but it is worth it.  And if you look close you can see I didn't even iron mine that thoroughly; you just don't want any giant wrinkles. 

Fold up about one fifth of the napkin.  It can be a little more or less but mine has a nice dotted line I want to be visible.  

Fold up again, this time so the fold ends up about halfway up the napkin.  

Carefully flip the napkin over.

Now fold one third over, keeping the folded bit nice and straight.  

Fold the final third over.  

Now flip the whole napkin over again and you will have a nice pocket to fit your silverware in.  I like to keep the knife pointing inward so people don't accidentally cut themselves.  
If I don't have place card settings, I will usually set this right in the middle of the plate.  But for tonight's dinner I do have place cards and will show you in the next post!

Happy napkin folding!

Friday, November 25, 2011

Coffee Filter Wreath Tutorial

It's entering the season of holiday decorations.  In truth, I think of them more as winter decorations because I leave them up until at least February!  Wreaths are one of my favorite things to make.  They can be elegant, they can be whimsical, they can really liven up a space.

I made a cork wreath last year that I wasn't too keen on and wanted to make a bigger one for our new house.  I have been playing a lot with coffee filters in my fiber arts class and saw a couple tutorials on coffee filter flowers and decided to make a coffee filter wreath!

Coffee Filter Wreath

You will need

Coffee filters: I used about 220.  100 white and 120 brown.

Wire wreath armature: I bought mine at the thrift store for 50 cents.  I used a wire one because I wired my flowers to the wreath.  If you choose to hot glue yours then a cardboard wreath might make more sense.

Acrylic paints, fat colored pens, sharpies, etc:  I experimented with a lot of different ways of coloring my coffee filters. 

Scissors
Stapler
Large tapestry or darning needle
24 Gauge wire
wire nippers
pliers
Start by dyeing and coloring all of your coffee filters.  I experimented with put a dollop of acrylic paint in a bowl mixed in with a cup of water and dipped the filters into the paint.  Then I squeezed out the excess and laid them out to dry.   Watering down any acrylic paints is key.  You want it more like a stain than thick paint. 

I also tried painting the edges and coloring the edges with markers for contrast.  I found out bigger and sloppier and more coverage is better since you are going to cut them apart at the next step and lose half the design.  I made a couple of flowers first to make sure it would work and then I colored and dyed all my coffee filters in advance so I would have a lot of different colors and designs to mix up together.  The whole kitchen and dining room floor was covered with drying coffee filters.  My husband can't wait until I've got my new studio up and running!

When your filters are dry, lay them in stacks of 3 or 4, depending on how heavy duty your scissors are.

Fold stack in half and then half again so that you have a wedge shape. 

Cut out the petals.  These can be rounded or short and stubby or long and pointy.  I went for long and pointy.  

Stack 4 cut out rounds on top of each other making sure the petals don't line up perfectly.  You want a lot of texture.  

Squeeze and fold together at the center of the flower and secure with a staple near the bottom.  

Repeat, repeat, repeat!  

Next, it is really up to you how you want to attach the flowers.  It mostly depends what kind of frame you find.  I poked two holes at the middle of the flower stems and hooked in a 2 inch piece of wire and wired each flower individually to the frame.  I used the pliers to fold down any sharp wires. 

I am not sure where to hang the wreath now.  I can't permanently attach it to our front door because it is paper after all and I am worried about rain and wind but I am little worried not many will see it over the fireplace.  We are having our house warming party tomorrow so I might think of a way to attach it to the front door temporarily.  
  

I love how fluffy and soft it looks. I think you could make endless variations with little fake birds or pine cones.

Less than $7 to make, what are you waiting for?