I went to a fun party this month called Tacoma Postcards. It was a community building party for the Tacoma Historical society with a arty twist.
Everyone was encouraged to make at least one postcard representing one of their favorite (or least favorite) buildings in Tacoma.
Now, I think of myself as an arty person that is interested in architecture, but when it came down to making my own, I was a little stumped where to start.
Showing posts with label arts. Show all posts
Tuesday, May 27, 2014
Tuesday, May 20, 2014
Building a Boat Sculpture: Part 1
The great thing about being at artist in Tacoma is that a lot of community art events exist here. I've been asked, along with 9 other artists, to create a boat sculpture for the Maritime Festival in September. It seems a long ways off but I want to make a fun, unique sculpture and that take time so I have started my sketches and prototypes now.
I started by researching different boat types and making a lot of sketches.
Friday, April 18, 2014
Sketchbook Inspirations
I went to the coast earlier this month, I dragged a whole bunch of art supplies with me. I do this on every trip I take and usually the art supplies stay in the bag or suitcase untouched for the duration of the trip. This time, however, I actually got some work done.
Monday, March 31, 2014
Spending Time With Your Food
I am taking an online art history class that is making me challenge myself a bit each week in my preconceptions about art. This week we covered how artists can show the passage of time and movement within a piece. And our sketchbook assignment was to use a series of photos to show time or movement.
I immediately thought about some sort of felting project to show in various stages as I was making it but then I realized I wanted to think about food in relation to time. I spend a lot of time making food and taking photographs, hopefully in as perfect or as appealing a state as possible, but us food bloggers don't spend much time telling you to slow down and enjoy your food or even to think much about the part about eating it. I joke all the time that I spend an hour and a half making something for dinner that we could easily inhale in 10 minutes if we don't pay attention.
So, for lunch today, I decided to pay attention.
I immediately thought about some sort of felting project to show in various stages as I was making it but then I realized I wanted to think about food in relation to time. I spend a lot of time making food and taking photographs, hopefully in as perfect or as appealing a state as possible, but us food bloggers don't spend much time telling you to slow down and enjoy your food or even to think much about the part about eating it. I joke all the time that I spend an hour and a half making something for dinner that we could easily inhale in 10 minutes if we don't pay attention.
So, for lunch today, I decided to pay attention.
Thursday, February 6, 2014
Doodles in the Sketchbook
I've been drawing like crazy lately. Maybe it's because I am still getting over my cold and finding myself in front of Netflix many evenings. Or maybe because I am in the middle of redoing both my blog and artist website and suddenly, the need to draw over takes any need to organize photos, check and refine old links, redesign logos etc.
Monday, February 3, 2014
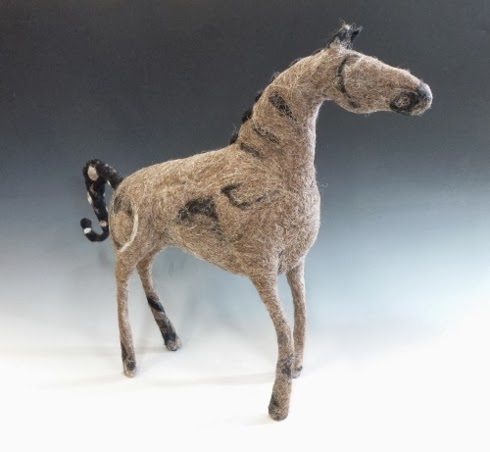
Year of the Horse Needle Felted Sculpture Tutorial
This is now the Year of the Horse, according to the Chinese calendar. Chinese New Year is a big deal here in Tacoma, Every new year (this year it was January 31st), a group of super secret glass artists distribute and hide 100's of glass spheres (Monkeyshines) all over the city. I have never found one. But then again, a lot of my friends get up at 5 AM to go find them and I come along 4 hours later and come up empty. Oh well, one day I will find one!
Instead of a sphere, I decided to make a needle felted year of the horse sculpture.
Friday, May 3, 2013
40 X 40: Visit Object Focus: The Bowl Exhibit
Visiting this exhibit as the Portland Museum of Contemporary Craft was a great way to start out my 40 X 40 list and get my creative juices mobilized. This exhibit, Object Focus: The Bowl is really about trying to create a dialogue within the arts community. They encourage you to write, draw, respond to what you see at the museum and make you reflect upon the humble bowl and how little it has changed over thousands of years.The second part of the exhibit, starting May 16th, is going to be more interactive with a bowl library and events with local chefs and the like. I guess I will have to go back and see the exhibit again!
The day I went to the museum it was free to go in because they are in the middle of installing the second part of the bowl exhibit. I bought a membership anyways because I have been wanting to support this museum for a long time. I was the only visitor wandering around among the bowls and the docent was very enthusiastic about talking about my favorite bowl or answering any questions.
Above is a bowl made of plastic knives. Below is a carved stone Native American mortar.
I love all the variety of bowls but felt like they shied on the side of too few bowls and the 50's and 60's were entirely over-represented for my taste. I would have preferred a few more made in the last year as well as some more that were over 100 years old.
The one below is a hand painted wooden bowl. Little tiny dots. Lovely. The plexiglass case made it hard to get a good photo.
Scale, texture, color; when you stop to look at them abstractly, they are little tiny sculptural works of art.
Even though I like to go to this museum every year, I actually heard about the exhibit on the New York Times in a great article about the impetus to put together this show and a link to the tumblr page where you are encouraged to upload a photo of a bowl and explain why it is interesting/important to you. You can spend a couple of hours just reading the stories and looking at all the beautiful bowls attached by readers.
These little bowls caught my eye.
Finally, when pressed by the docent on what my favorite bowl was, I had to admit it was this little brushed silver bowl. This surprised me a little as I came in thinking I would be drawn to an organic, hand sculpted one. Probably made on a metal lathe, but also possibly hand forged, it is absolutely delicate and strong at the same time. And so, so soft with that finish. I wanted to hold it and run my hands along the inside of it.
If you are anywhere near Portland, get thyself to the Museum of Contemporary Craft! (But after May 16th so you can catch all the added interactive goodies!)
The day I went to the museum it was free to go in because they are in the middle of installing the second part of the bowl exhibit. I bought a membership anyways because I have been wanting to support this museum for a long time. I was the only visitor wandering around among the bowls and the docent was very enthusiastic about talking about my favorite bowl or answering any questions.
Above is a bowl made of plastic knives. Below is a carved stone Native American mortar.
I love all the variety of bowls but felt like they shied on the side of too few bowls and the 50's and 60's were entirely over-represented for my taste. I would have preferred a few more made in the last year as well as some more that were over 100 years old.
The one below is a hand painted wooden bowl. Little tiny dots. Lovely. The plexiglass case made it hard to get a good photo.
Scale, texture, color; when you stop to look at them abstractly, they are little tiny sculptural works of art.
Even though I like to go to this museum every year, I actually heard about the exhibit on the New York Times in a great article about the impetus to put together this show and a link to the tumblr page where you are encouraged to upload a photo of a bowl and explain why it is interesting/important to you. You can spend a couple of hours just reading the stories and looking at all the beautiful bowls attached by readers.
These little bowls caught my eye.
Finally, when pressed by the docent on what my favorite bowl was, I had to admit it was this little brushed silver bowl. This surprised me a little as I came in thinking I would be drawn to an organic, hand sculpted one. Probably made on a metal lathe, but also possibly hand forged, it is absolutely delicate and strong at the same time. And so, so soft with that finish. I wanted to hold it and run my hands along the inside of it.
If you are anywhere near Portland, get thyself to the Museum of Contemporary Craft! (But after May 16th so you can catch all the added interactive goodies!)
Tuesday, October 2, 2012
Making A 3D Papier Mache Animal Sculpture: Part 2
Catch the first post in making a 3D animal here.
After I cut out the cardboard and placed and glued the tube inside my dog, I started to cover him with crumpled up newspaper covered with masking tape to make the bulk of his body. I like completely covering it with tape because it makes a smoother surface to apply the papier mache. First I bulked up his body and then I taped on his legs and bulked them up with paper as well. I tried to make him look as 3D as possible: I didn't want him to look like he was made from 2 flat pieces of cardboard, although that is totally a design decision.
Here he is, covered with paper and tape, ready for the papier mache. My friend Ann was creating an ox right behind him.
Next you need paper for the papier mache. While newspaper worked great for the bulking up part, it gets super messy when you are using the paste and the newsprint starts to get all over the place. So we went to our local newspaper and purchased an end roll and it was only $3! It was a big roll and we could have used it for the scrunching up part too but since I get the Sunday New York Times we are never wanting for paper in this house.
Cut the strips into manageable pieces. I found that I could cut straight down the roll with a utility knife and it created wide strips about a foot wide. Then I could tear them along the grain into strips and then tear the strips crosswise into easy to use pieces. Next, you need your GH-57 Universal Wallpaper Paste. I use it straight from the container. I don't thin it with water at all. Be sure to wear gloves. I pour it into a plastic salad container I have saved and then dip my fingers into the paste and then cover the paper. DO NOT DIP PAPER INTO PASTE. This makes the biggest mess and you end up using way too much paste.
Note: some people like to use flour and water and that is fine and great with kids. Wallpaper paste has anti-fungal chemicals in it which is great when applying a couple coats at a time like I do. Again, make sure you wear gloves!
It helps if you have a good studio assistant.
Cover your entire piece with strips slightly overlapping and, if possible, all going in the same direction. That way it will be easier to lay the next layer and know how much you have done. Try to smooth the paper out flat and get out any air bubbles. It's best to do only a couple layers max at a time and let it dry before the next layers. I did about 7 layers. I wanted him to be very sturdy.
Now I made him for the Chinese Moon Festival here in Tacoma so I wanted to decorate him with Chinese style patterns. After looking at some designs, I settled on a combo of the 2 designs on the left.
I painted him with a base coat of 2 coats of exterior latex paint and then drew free hand right on the sculpture.
Then I used artist acrylics and an angled detail brush to paint in the design.
I love how he turned out! All in all only about $20 worth of materials for a four foot sculpture!
After I cut out the cardboard and placed and glued the tube inside my dog, I started to cover him with crumpled up newspaper covered with masking tape to make the bulk of his body. I like completely covering it with tape because it makes a smoother surface to apply the papier mache. First I bulked up his body and then I taped on his legs and bulked them up with paper as well. I tried to make him look as 3D as possible: I didn't want him to look like he was made from 2 flat pieces of cardboard, although that is totally a design decision.
Here he is, covered with paper and tape, ready for the papier mache. My friend Ann was creating an ox right behind him.
Next you need paper for the papier mache. While newspaper worked great for the bulking up part, it gets super messy when you are using the paste and the newsprint starts to get all over the place. So we went to our local newspaper and purchased an end roll and it was only $3! It was a big roll and we could have used it for the scrunching up part too but since I get the Sunday New York Times we are never wanting for paper in this house.
Cut the strips into manageable pieces. I found that I could cut straight down the roll with a utility knife and it created wide strips about a foot wide. Then I could tear them along the grain into strips and then tear the strips crosswise into easy to use pieces. Next, you need your GH-57 Universal Wallpaper Paste. I use it straight from the container. I don't thin it with water at all. Be sure to wear gloves. I pour it into a plastic salad container I have saved and then dip my fingers into the paste and then cover the paper. DO NOT DIP PAPER INTO PASTE. This makes the biggest mess and you end up using way too much paste.
Note: some people like to use flour and water and that is fine and great with kids. Wallpaper paste has anti-fungal chemicals in it which is great when applying a couple coats at a time like I do. Again, make sure you wear gloves!
It helps if you have a good studio assistant.
Cover your entire piece with strips slightly overlapping and, if possible, all going in the same direction. That way it will be easier to lay the next layer and know how much you have done. Try to smooth the paper out flat and get out any air bubbles. It's best to do only a couple layers max at a time and let it dry before the next layers. I did about 7 layers. I wanted him to be very sturdy.
Now I made him for the Chinese Moon Festival here in Tacoma so I wanted to decorate him with Chinese style patterns. After looking at some designs, I settled on a combo of the 2 designs on the left.
I painted him with a base coat of 2 coats of exterior latex paint and then drew free hand right on the sculpture.
Then I used artist acrylics and an angled detail brush to paint in the design.
I love how he turned out! All in all only about $20 worth of materials for a four foot sculpture!
Thursday, September 13, 2012
Making A 3D Papier Mache Animal Sculpture: Part 1
It seems for an art and crafty blog, my programming has been more eating and pets lately so I am going to try and get some art stuff back into the mix!
I've been asked by a friend to make a large, 3D sculpture of an animal in the Chinese zodiac to be carried in a boat parade during the opening of the new Chinese Reconciliation Park here in Tacoma. About half the animals were already taken so I chose dog from what was left over. It seemed appropriate to my life right now. They need to be about 4 feet tall/wide and light weight enough to carry on a dragon boat. I have no idea how they are actually going to be used. I will find out on September 29th!
First, I started by researching the Chinese Zodiac and printing out some dog examples. (see above) I decided I didn't want the Pomeranian style dog so I went with a little more stereotypical, yet stylized, dog. But he's a happy dog.
I drew him on a one inch scale and then roughly transferred him to a one foot scale on cardboard. My friend Kim is also working on this project and she gets giant heavy duty bike boxes from her husband's work. Handy.
I cut out 2 body silhouettes because a) it's supposed to be 3-D and b) we need to have a tube in his body for a stick to hold them to go inside. The one at the front of his body is just to balance it out. I bought a long piece of plumbing pipe at the hardware store and then just cut them to size with a hack saw. I used heavy duty adhesive to glue the pipes to the cardboard and taped them down to hold them in place while drying.
Next, I applied glue to the tops of the pipes and set the top cardboard down and weighted it with books.
Good to know my art history textbook from college still has its uses! The tail is not glued in yet, I just set it there for looks.
Next part I will be attaching the legs and tail and then bulking up the body to make it 3-D. It's fun to do these big arty community projects.
I've been asked by a friend to make a large, 3D sculpture of an animal in the Chinese zodiac to be carried in a boat parade during the opening of the new Chinese Reconciliation Park here in Tacoma. About half the animals were already taken so I chose dog from what was left over. It seemed appropriate to my life right now. They need to be about 4 feet tall/wide and light weight enough to carry on a dragon boat. I have no idea how they are actually going to be used. I will find out on September 29th!
First, I started by researching the Chinese Zodiac and printing out some dog examples. (see above) I decided I didn't want the Pomeranian style dog so I went with a little more stereotypical, yet stylized, dog. But he's a happy dog.
I drew him on a one inch scale and then roughly transferred him to a one foot scale on cardboard. My friend Kim is also working on this project and she gets giant heavy duty bike boxes from her husband's work. Handy.
I cut out 2 body silhouettes because a) it's supposed to be 3-D and b) we need to have a tube in his body for a stick to hold them to go inside. The one at the front of his body is just to balance it out. I bought a long piece of plumbing pipe at the hardware store and then just cut them to size with a hack saw. I used heavy duty adhesive to glue the pipes to the cardboard and taped them down to hold them in place while drying.
Next, I applied glue to the tops of the pipes and set the top cardboard down and weighted it with books.
Good to know my art history textbook from college still has its uses! The tail is not glued in yet, I just set it there for looks.
Next part I will be attaching the legs and tail and then bulking up the body to make it 3-D. It's fun to do these big arty community projects.
Friday, August 17, 2012
Opera for All
I had the great pleasure of seeing the opera Turandot at the Seattle Opera two days ago. Puccini's Turandot is about a princess that relishes her freedom being unmarried and kills her suitors if they can't answer her three riddles. She meets her wit's match in the unknown Prince. I've mentioned before how much I enjoy opera and so I might as well say it again. It's part musical, costume drama, symphony, sculpture, performance art, humor, dancing, acting, singing, and poetry all rolled into one. And Turandot is also pretty violent. (OK, artistic violence, but in spirit it's as violent as any action picture.) So you can't say opera is boring or all sappy love stories and such.
I was struck that I needed to say more about opera after reading an article in the New York Times today about How Hollywood Films Are Killing Opera. Basically, the article points out how a few movies like Moonstruck and Pretty Woman have made the American viewer think that real opera can only be serious and traditional and thus has stopped opera houses all over the country from trying anything new or innovative because the masses won't come to anything they don't think is real opera.
I both agree and disagree with this premise. Moonstruck went a long way to making me interested in opera to begin with, only it took a couple of decades and more money in my pocket to finally get to go see any opera. The price is one of the main reasons in keeping people away from it. But really, when you see the sets and the costumes and all the actors and musicians that take part, you realize how cheap the tickets really are. Stop and think, how much do people pay for Madonna and Paul McCartney tickets? At some point in my early thirties, I lost interest in going to concerts and staying up all night in clubs but I still longed for rich cultural experiences and opera has helped to fill that need easily. And maybe in New York opera is all fancy pantsy and intimidating but at the Seattle opera I have seen Crocs and polo shirts and dog collar necklaces and Birkenstocks as well as full on suits and fancy strapless gowns. You can take it to whatever level you want. As a newbie to opera (I have only seen four.), I find myself wanting to see a lot of the traditional "classics" just as the article states. And I don't think this is wrong. But the more opera I see, the more interpretations I want to see and the more variety I want to see. And as I looked over the Seattle Operas current season, I caught myself thinking I wasn't interested in the unknown operas and that we really needed to see Cinderella and La Boheme. But I am still a beginner and need to pick and chose carefully where I spend my opera dollars. Hopefully next season I will be able to get season tickets and then I will get to experience a larger range. I also have a fantasy of traveling the world to see different versions of the Barber of Seville, my first and favorite opera so far.
If you have a chance to see opera, don't turn it down. You may be surprised how much you like it. And do research. Read up on the opera or listen to it beforehand if possible. The more you know, the more you can appreciate and enjoy.
Thursday, August 16, 2012
Roadtrip Portland: Part 2
After our Mississippi Street dining and shop, we headed over to the Pearl District to visit the Museum of Contemporary Craft. I was mostly interested in viewing what was on sale in their gift shop but when we saw the show was a retrospective of Oregon artist Betty Feves, we were intrigued and decided to see the show.
Not very knowledgeable on ceramics in general, I had no idea who Betty Feves was. Turns out she was pretty interesting. She created a large body of work, particularly in the 1950'2-1970's, and was important in several ways.
First, she experimented with creating large scale pieces. And I mean large ceramic sculptures, taller than me. She worked both figuratively and abstract. Not many women were working large scale in ceramics at this time.
Secondly, she worked and thrived in Eastern Oregon, a basic wasteland for art and ceramics, especially mid-century.
Third, she created her own glazes from natural materials. It is very easy to see where her influences come from if you have ever seen the landscape in Pendleton.
I appreciate retrospectives where the artist has dabbled and evolved their style through many mediums and designs. They showed jewelery and paintings along with her ceramic sculptures and vessels. Unfortunately the show's last day was the day we were there (lucky!) but the shows opening this month at MOCC make me think I need to schedule another trip down to Portland soon!
Next up after the museum, we headed to Cacao, a chocolate boutique and drinking chocolate cafe. And, no, I do not mean hot chocolate or Mexican hot chocolate, although it is similar. I mean drinking chocolate. Which means whole milk and rich, high cacao content chocolate with just a touch of sugar and spice added if desired. Here I am drinking a 2 oz cup of the spicy drinking chocolate alongside a caffe macchiato (espresso with foam). Heaven.
After Cacao and the Museum of Contemporary Craft, we hoofed it over to the Hawthorne District for shopping and drinks. (Note: When I mention to people I am going or have been to Portland, most people ask if I went on the train. The train is nice if you are going to stay downtown or have lots of cash to spend on taxis or lots of time to spend on mass transit. Want to see the interesting parts of Portland in a weekend? Drive.)
Lots of people love Powell's Books in the Pearl District but they don't realize that there are several different locations specializing in different themes. On Hawthorne they have a Crafts and Garden and Cooking shop. Talk about things to see and buy forever! We spent a lot of time browsing and I ended up buying Blood, Bones & Butter: The Inadvertent Education of a Reluctant Chef by Gabrielle Hamilton. I made my girlfriends each buy a copy of My Life in France by Julia Child. I'm serious, I picked 2 copies off the shelf and said, "Here, you must buy and read this and if you don't we are no longer friends." Not quite like that, but close. It's a good book.
Next, we drove down to the end of Hawthorne to try out the Sapphire Hotel which is really just a bar, not a hotel. And we could have walked, but it was warm out, and, hey, we had a busy itinerary. A friend of mine has been recommending this place forever and wow, was it worth it. They had a make-your-own Manhattan and Martini menu where you could pick out the bourbon or gin, respectively, along with which vermouth. Classy.
Then we had to hustle back to check in at our hotel and get ready for dinner. We ate at Andina Peruvian in the Pearl district which I had gone to before but my friends had not. Think loud and busy and delicious and it is amazing how sexy a chef can make qunioa or corn look on a plate! My photos didn't turn out due to poor lighting so you'll just have to check it out for yourself.
The next morning I needed a nice solid breakfast to tweak away the alcohol residues and fuel me for the drive home. We headed back out to Mississippi to a breakfast place we had eyeballed the day before: Equinox. The service was lousy but it was worth it. This is a "breakfast pillow." Think puff pastry surrounding caramelized veggies topped with poached eggs and a pasilla cheese sauce. Poached eggs are a popular breakfast menu item in Portland. I wish Tacoma restaurants would take note.
It's only been two weeks, but I am already thinking it is almost time to head back down there! I need to make this at least a quarterly event.
Not very knowledgeable on ceramics in general, I had no idea who Betty Feves was. Turns out she was pretty interesting. She created a large body of work, particularly in the 1950'2-1970's, and was important in several ways.
First, she experimented with creating large scale pieces. And I mean large ceramic sculptures, taller than me. She worked both figuratively and abstract. Not many women were working large scale in ceramics at this time.
Secondly, she worked and thrived in Eastern Oregon, a basic wasteland for art and ceramics, especially mid-century.
Third, she created her own glazes from natural materials. It is very easy to see where her influences come from if you have ever seen the landscape in Pendleton.
I appreciate retrospectives where the artist has dabbled and evolved their style through many mediums and designs. They showed jewelery and paintings along with her ceramic sculptures and vessels. Unfortunately the show's last day was the day we were there (lucky!) but the shows opening this month at MOCC make me think I need to schedule another trip down to Portland soon!
Next up after the museum, we headed to Cacao, a chocolate boutique and drinking chocolate cafe. And, no, I do not mean hot chocolate or Mexican hot chocolate, although it is similar. I mean drinking chocolate. Which means whole milk and rich, high cacao content chocolate with just a touch of sugar and spice added if desired. Here I am drinking a 2 oz cup of the spicy drinking chocolate alongside a caffe macchiato (espresso with foam). Heaven.
After Cacao and the Museum of Contemporary Craft, we hoofed it over to the Hawthorne District for shopping and drinks. (Note: When I mention to people I am going or have been to Portland, most people ask if I went on the train. The train is nice if you are going to stay downtown or have lots of cash to spend on taxis or lots of time to spend on mass transit. Want to see the interesting parts of Portland in a weekend? Drive.)
Lots of people love Powell's Books in the Pearl District but they don't realize that there are several different locations specializing in different themes. On Hawthorne they have a Crafts and Garden and Cooking shop. Talk about things to see and buy forever! We spent a lot of time browsing and I ended up buying Blood, Bones & Butter: The Inadvertent Education of a Reluctant Chef by Gabrielle Hamilton. I made my girlfriends each buy a copy of My Life in France by Julia Child. I'm serious, I picked 2 copies off the shelf and said, "Here, you must buy and read this and if you don't we are no longer friends." Not quite like that, but close. It's a good book.
Next, we drove down to the end of Hawthorne to try out the Sapphire Hotel which is really just a bar, not a hotel. And we could have walked, but it was warm out, and, hey, we had a busy itinerary. A friend of mine has been recommending this place forever and wow, was it worth it. They had a make-your-own Manhattan and Martini menu where you could pick out the bourbon or gin, respectively, along with which vermouth. Classy.
Then we had to hustle back to check in at our hotel and get ready for dinner. We ate at Andina Peruvian in the Pearl district which I had gone to before but my friends had not. Think loud and busy and delicious and it is amazing how sexy a chef can make qunioa or corn look on a plate! My photos didn't turn out due to poor lighting so you'll just have to check it out for yourself.
The next morning I needed a nice solid breakfast to tweak away the alcohol residues and fuel me for the drive home. We headed back out to Mississippi to a breakfast place we had eyeballed the day before: Equinox. The service was lousy but it was worth it. This is a "breakfast pillow." Think puff pastry surrounding caramelized veggies topped with poached eggs and a pasilla cheese sauce. Poached eggs are a popular breakfast menu item in Portland. I wish Tacoma restaurants would take note.
It's only been two weeks, but I am already thinking it is almost time to head back down there! I need to make this at least a quarterly event.
Road Trip: Portland Part 1
Portland Roadtrip:
-Leave 8:30 AM and Arrive by 11:00 AM.
-Explore Mississippi District (An area I had not been to.) Have lunch. Shop.
-Head to Pearl district, go to Museum of Craft and Cacao, a drinking chocolate cafe.
-Head back over river to Hawthorne Street. Shop at Powell's craft and garden store. Check out boutiques nearby. Cocktails at Sapphire Hotel.
-Head back downtown to check into hotel and change for dinner. Late dinner at Andina Peruvian in Pearl district.
-After dinner drinks at hotel bar.
Phew. I am tired just writing that. Well, we stuck to our itinerary like glue and hit all the places we wanted.
First stop: Mississippi Street. This is a fun arty street running north-south that is north of downtown Portland but you have to head east over the Willamette river to get there. Endless jokes as I was driving and trying to park about all the bicyclists and the dangers of hitting one and how we could be in an episode of Portlandia. If you have seen the show, but never been to Portland, trust me, it's a pretty good satire of the truth.
The main reason to hit up Mississippi street was to visit The Meadow. This tiny shop, the sister store of a larger shop in New York, is tucked into a tiny corner space next to a comic book shop. Their specialty is salt and chocolate. I like to use flavored salts in my cooking and this place was recommended by three different people when I told them I was going to Portland for the weekend. Now that is pretty good word of mouth right there.
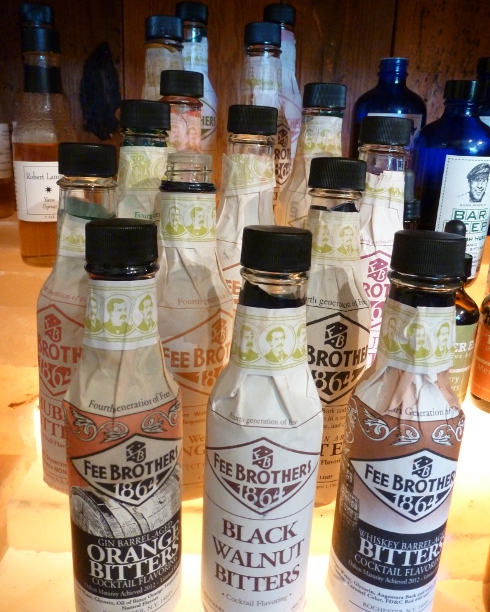
What I didn't know was that along with chocolate and salt, The Meadow has a entire wall dedicated to bitters. I promptly started sampling bitters and completely forgot to buy any salt or chocolate. Bitters are a (mostly) alcoholic apertif flavored with fruits and herbs and are used in cocktails. They were marketed as "medicines" during prohibition and now they are still found in the non-booze sections of stores and not subject to alcohol taxes. Funny, huh? Anyways, we love to mix up Manhattans and Old Fashioned but more recently I discovered the bliss of a few drops of bitters into sparkling water. Refreshing perfection.
I ended up buying 4 types of bitters: rhubarb, celery, bitter orange, and a four citrus blend. Happy.
The Meadow also sells gadgets to grind your salts. The top photo is of slabs of salt that you can use as serving platters or even to cook on to add flavor to your food.
These roasted cocoa nibs were deliciously bitter.
The wall of chocolate was impressive. But after my tour of Theo's Chocolate factory, I admit I am a little bit over the thrill of chocolate. Later when we went to have drinking chocolate, I only had a tiny 2 oz cup.
While in Mississippi we had lunch at Por Que No, a delightful taqueria with a location also on Hawthorne street which I had been to before. It's a casual taco spot but with very strict rules on ordering before you sit down. I love that for $3 you can get a plate of spicy cucumbers to start your meal with.
All three of us ordered their brunch special of potato cakes with poached eggs, beans, veggies, and crema. Cannot tell you how delicious this was. I enjoyed iced hibiscus tea on the side.
Also, I was so excited about one more shop on Mississippi that I didn't take any photos: Paxton Gate. They are an awesome taxidermy/oddity shop where I bought some glass eyes for my felt sculptures and a carved claw necklace. Very steampunk.
More posting soon about the rest of the trip!
Thursday, July 26, 2012
On Donating (Or NOT Donating) Your Work
I get asked multiple times a year to donate something I made to an auction: It's such an important charity, it's good for your exposure, it will help raise money! And when I say multiple, I mean at least once per month. When I was younger, I donated willingly and often to many good causes. I didn't have money to donate so I figured donating work was the next best thing. Right?
I have now realized that answer is unequivocally wrong. While art lovers love to snap up cheap works of art at silent and live auctions, all they are doing is underpricing the work. Who will buy your sculptures for $250 if they purchased one already for $75? In this economy, items rarely go above list price at auctions. And as an artist, you can't write off the worth of the piece, you can only write off the value of the materials.
So this polar bear sculpture that took me many hours to make and valued over $250 could only be written off for about $5, the cost of the wool and stiffener. I know why the IRS does this. If I could say this sculpture was worth $1000 and then proceed to write it off, I would donate enough work to cover our yearly taxes!
But then again, what about exposure? The vague promise of recognition and networking? I have never, ever, had a sale come after someone saw or purchased one of my items at an auction. Maybe someone was influenced and never told me? I'll never know for sure, but usually people are proud and happy to mention things like this.
I think it is far better to just volunteer for a charity you like. That way you meet new people, maybe network a little, and save your best work for the galleries!
Finally, what if it is a good cause? I now allow myself to donate one or two items a year, tops. I was asked to donate an item to the Point Defiance Zoo and Aquarium for their fundraiser this month and as I used to volunteer and work there, I decided I would make this polar bear sculpture since I have positive feelings for the organization. I was sad to see it go; I had a lot of fun making this sculpture but I know it will probably end up with someone who cares about the zoo as much as I do.
Just don't ask me to donate anything else for the next 6 months!
Subscribe to:
Posts (Atom)