Saturday, August 27, 2011

Trying to Drink Sparkling Water the Eco-Friendly Way

We like to drink sparkling water at our house instead of cola or other expensive non-alcoholic beverages.  I usually buy the 2 Liter bottles of the lemon-lime sparkling water in the Fred Meyers brand.  But it is expensive over time and I hate having to recycle all those plastic bottles.  Now we can reuse 1 bottle over and over because we broke down and bought our own SodaStream!  Several of our friends use these and now we have jumped on the home soda bandwagon.
Our local gourmet grocery store carries them.  They make soda with a simple CO2 container that you can exchange back at the shop when you use it all up.  But one CO2 canister should last 60 liters. 

You fill the water container with cold tap water and then it takes about 3 seconds to carbonate the water and then, if you want, you can add any flavoring of your choice.  The regular flavorings work out to about 8 calories per glass of water.  You can buy diet flavors too and "natural" flavors as well. We were a little skeptical about the natural: they all contain fake flavors.  Just get over it, people! 

So far I have just had the lemon-lime, but it is tasty. 
We also bought some extra bottles so we can have them chilling in the fridge and then try out some of the other flavors.  If you like to drink sparkling water, this is probably worth the up front cost.  It doesn't have to plug in since it is powered by the CO2 canister so it doesn't have to be kept up on the counter.  Nice for entertaining too.  And you can use a lot of the flavors for mixing cocktails.  Who knew?  

Eastlake Apartment Boogie

Last night's dinner at Canlis was amazing.  It was food opera: I don't even know how else to explain it.  Sparkling rose in the bar.  Steak Tartar and three types of Yellow Fin Tuna shashimi to start.  Followed by crisp and refreshing salads and then a tiny shooter of wild onion vichyssoise.  Perfect medium rare Filet Mignon and mushrooms swimming in a butter bath.  Tasty wine after tasty wine. Million layered banana with chocolate and more types of chocolate.  Scotch. 

Heaven is right up there in Seattle with perfectly coordinated waiters that ironed the table cloths right on the tables and a pianist that took our requests for the British group the Cure and the French composer Satie with equal style and grace.

I was so inspired by the meal, I painted this painting today for our friends that took us out.  I am basking in happiness. 

Friday, August 26, 2011

37 Things: Make a Piece of Wearable Art That Has Felting on It.

I have been thinking for a while about this item on my list of 37 Things I Want to do Before I Turn 38. I definitely wanted to make something a little funky, a little eye catching, and definitely one of a kind and I got the idea for a Faux Fox Stole after seeing some done in crochet.  I thought the idea would translate better to felting.  I am satisfied with my results.  And I only consider this my prototype; I plan on making another one.

Originally I was thinking to make this in time to wear to the Seattle Opera in October. (We are going to Carmen: can't wait!)  But some friends invited us to go to the Canlis in Seattle with them tonight for a birthday and that is such a swanky place, I thought it would be fun to make it in time for the dinner.  It took me about 4 days, working about 2 hours per day.  I spent about 20 hours sketching and thinking about it first!

All the main body parts were done by wet felting.  At first I was going to have the legs attached to the body from the start but in the end I made them separately and then needle felted them on after I figured out how I was going to wear it.  The eyes and nose were done with needle felting.  I love the little white tip I put on his tail.  I am wearing black for sure, so it will really stand out.  I attached a barrette underneath the head so that I can clip it on to any part on the scarf.  I may need to change that part on my next one but for now it works great.

Now I need to go and figure out the rest of what I am going to wear tonight!   

Tuesday, August 23, 2011

Sangria For the Masses

We hosted a big Sangria and Mexican food potluck last weekend and had about 25 people in our house.  It was loud, the food was delicious, it was fun, and my Sangria was a big hit.  I borrow this lovely dispenser from my dad whenever I am making Sangria.   My secret to this Sangria is that I add a lot of sparking water to it to lessen the alcoholic punch and the guests don't even realize it!  
 
Red Sangria

1/2 bottle brandy (1 1/2 cups brandy, pear preferred)
1-2 oranges  cut into half and or quarter slices
2 limes cut into half and or quarter slices
2 lemons cut into half and or quarter slices
2 apples cut into 1" pieces
bunch red grapes
pineapple (optional)  1" pieces
3 bottles of inexpensive Rioja (tempranillo)
1 can frozen limeaid concentrate
1 quart -1 liter sparkling water, lime or lemon flavored

Mix brandy with cut fruit and let sit over night. Next day drain brandy from fruit.

Mix everything together (accepting reserved fruit) Serve on rocks with a few pieces of soaked fruit in each glass

It is nice if you have unsoaked lime wedges for additional garnish and a maraschino cherry.
This is very easy to tweak, depending on what you have on hand.  

I've Got My Eye on You

Last night I was catching up on my Mad Men on streaming Netflix--I have only just started season 2 and am really enjoying the sets and costumes.   I am not one that can be idle in front of a television, so I set up my needle felting supplies and ended up with this little guy after watching 3 episodes in a row. 
For some reason, I can never have enough Octopus art in my life! 

Saturday, August 20, 2011

How to Use Up All that Zucchini in Your Garden

We are having a giant Sangria and Mexican food potluck at our house today and I just had to stop in the middle of my cooking to share this delicious dip I just made up.  OK, if I looked into it, I am sure someone else has already thought of this but I call that parallel evolution and still consider this my own.  

In honor of high summer and the zucchinis bursting at the seam in the garden, here is a yummy  vegan sandwich spread or dip to use up all that summer squash you are ignoring!

Jennevieve's Smokey Zucchini Dip

3 large zucchinis, sliced angled in 1/4" plus thickness
2 chipotles in adobo sauce
3 cloves garlic
1/2 cup loosely packed chopped cilantro
1 Tablespoon olive oil
juice of one half lemon
smokey sea salt (I used my new Alderwood Smoke flavored Sea Salt from Libertine Tacoma

Grill zucchinis.  Don't use any oil, just lay them out on a hot grill and turn regularly until they have nice black marks and they are getting mushy.  Allow to cool while prepping the rest.

Combine garlic, chipotles, and cilantro in food processor and pulse until blended.  Chop up zucchini in large dice and add to processor.  Blend well.  Add olive oil, lemon juice, and salt.  Adjust seasonings to taste.

This is spicy!  Today we are using it for a tortilla chip dip but I can't wait to make sandwiches with this!

Thursday, August 18, 2011

To Friends!

I received 2 special gifts last weekend.

My friend Patrick just got back from Columbia and brought me a whole bag of goodies, but this clay serving dish is just gorgeous.  The weight and feel of it is very substantial, very handmade.  The spoon is also clay.

I also received a hostess gift at our dinner party from my friend Ann.  Thank you, Ann! 

This is Alderwood Smoked flavored sea salt from a local Tacoma shop, Libertine Tacoma and it is delicious with an extra smokey kick.

As I was admiring my gifts, I had a thought.  It's like peanut butter and chocolate!

They belong together!

We are having a Mexican/Spanish themed potluck and Sangria party this weekend and I think this will be perfect on top of some roasted jalapenos!
A los amigos!

Wednesday, August 17, 2011

Mixed Felt Flower Tutorial

 
I've seen a lot of tutorials for making fabric flowers whether twisted and sewn or the layers cut out and glued or stitched together, I have yet to find a flower including needle felting and fabric.  So I decided to make up my own that combines needle felted wool and felt yardage. 
You will need:
felt fabric at least 18" in width
handful of wool roving in a coordinating color
felting needle (size #38 ideal)
needle and thread
scissors
Fabric Tac glue (optional)
 

First cut a piece of felt fabric 1" x 18".  I used felt made from recycled plastic bottles but wool blends are nice too.  You don't need a ruler, just eye ball it. 

Next you will snip along entire piece, every 1/4" to about a 1/4" from the edge.  Don't worry if you cut one or two (or five) too close to edge.  We will be sewing this all together so it won't fall apart.

Note: I am using my new, ergonomically correct SoftTouch scissors from Fiskars and I love them!  My hands usually cramp up when I am using scissors but not with these babies.  You could also use a cutting wheel too. 

Set your snipped fringe piece aside while you work on the center of the flower.  Take your handful of roving and roll into semi-loose cylinder.   You don't want it too loose, however.  Needle felting works best when you compress the wool. 

Begin to poke with your felting needle.  Remember those felting needles are sharp!   Keep rotating the wool and poke from all sides and keeping it firmly compressed.  Try to make the bottom flat and the top rounded.  Poke, poke, poke!

By starting with a cylinder, you should end up with a raspberry shape.  

At this point you could add felted or embroidery accents to your flower center, but I am going to keep mine simple.  You want the wool to be fairly compact and compressed.  You will be sewing to it so if you make it too wispy it might not work.
 
Now you are ready to assemble your flower.  I like to start by using a little bead of Fabric Tac at the end of the fridge piece.  This just helps everything stay in place while you sew and is not necessary.

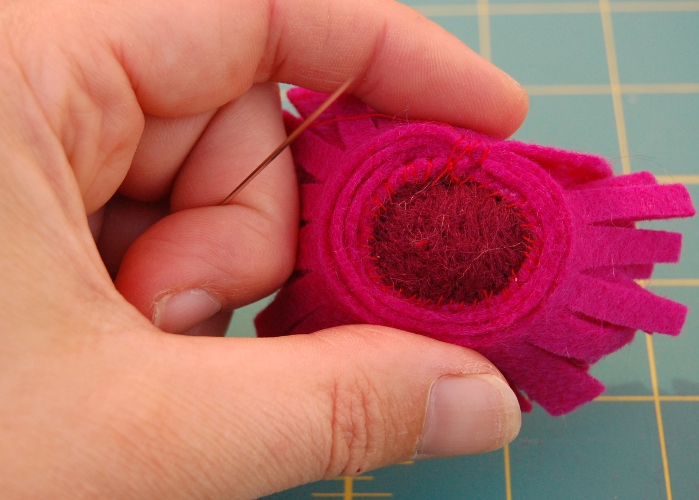
Start by rolling the fringe around your wool ball with the flat part of the fringe against the bottom of the ball. 

Roll three times around ball and then sew in place.   Start with a secure knot. 

Once you have sewn the whole way around, wrap the rest of the fringe flat around the base. 

Finish sewing securely by stitching the entire way around.  You don't want your flower falling apart! 

Ta da!  You have finished a felt flower! 

At this point you can add a pin back or barrette or sew it onto something.  To add a barrette, simply cut a piece of fabric to cover the base.  Apply Fabric Tac all over base.  Slide circle of fabric through barrette and place on glue, adding glue to top of barrette.  Allow to dry overnight for a fabulous felt flower barrette! 

Once you have made a few, it will be hard to stop!  The bigger flowers I made by sewing a 1" by 9" cut fringe piece to the needle felted center and then finished it with a 2" x 18" cut fringe piece.  
 

Tuesday, August 16, 2011

37 Things: Blog 175 Times

Hard to believe I have hit 175 blog postings in 10 months.  It seemed like a daunting amount of posts at the time.  Next year I will need to set my goal a little higher! 

My backyard is looking luscious right now.  The mint shrub is in full bloom and the bees are as excited as my neighbors at an all you can eat buffet.  My veggie garden is on full throttle mode as well.  The zucchini and leeks are pretty boisterous.  And my tomato plants are spilling out of their little cages all over the place.  They never make it into the kitchen.  I stand in the shade and pop the sweet cherry tomatoes right into my mouth. 
I moved my Adirondack chairs out of the way for our big dinner party and I am liking them in this spot in the shade.  Perfect reading spot.

I still have many items to complete on my list of 37 Things To Do Before I Turn 38 but I am in progress on a few of them and I am satisfied that the most important ones have been completed.  (Get off the continent, run/walk a half marathon, donate blood, throw a fundraiser.)  Two months to go before I start my next list! 

Monday, August 15, 2011

37 Things: Throw a Dinner Party for 20

This is one of my favorite things on my list of 37 Things I Want to do Before I Turn 38.  The same thing happened as last year.  We ended up being 18 at table.  So I just need to change my goal to Throw a Dinner Party for 18.  Why fish sauce as the lead photo?  The menu was a Southeast Asian theme and I admit it, I buy my fish sauce based purely on a photo of a baby holding a bottle of fish sauce with a picture on it of a baby holding a bottle of fish sauce.
The menu:
Drinks
*Singapore Slings 
*Gin with Lime-aid and a ginger simple syrup
*Rose and Red Wine
Appetizers
*Spicy peanut/cashews
*Wasabi Peas
*Spicy Canteloupe with basil
First Course
*Fresh Spring Rolls with a Peanut Dipping Sauce
Main Course
*Vietnamese Salad with Grilled Pork Salad, Hanoi Style with Nuoc Cham sauce
Dessert
*Cream Puffs with a Chocolate Glaze and Mint Garnish

The key to throwing a big dinner party is making lists.  Making lists and picking out food that can be prepped in advance.  And having a good friend come a little early to help you put everything together.  Unless of course, you can afford to hire a waiter.  Which I should have done, but oh well, the hostess doesn't really need to talk to everyone anyways!  I hit the ground running at 8am in the morning and didn't stop for any breaks until the guests started arriving at 5pm.

The Singapore Slings were a big hit.  We made a big pitcher of it so it was easy to hand out drinks as people arrived. 

I was able to prep everything for the spring rolls and then pass off the assembling to my friend Greg.  He was a superstar helper.
The weather was perfect.  We had to divide the party up into two tables to fit everyone comfortably in the back yard.
Dahlias were the flower of the day.  I purchased 3 bouquets at the farmers market that morning and then our friend Rosie showed up with this beautiful bunch as well. 

Bonus: my new, extra long felting table works perfect for entertaining as well!

Assembling the salads was fun.  Vietnamese salad is one of my favorite dishes to make and eat.
I like to take the time thinking about the appearance of the dish as much as the flavor of the dish.
There were very few leftovers at the end of the night.
With just a few stragglers at the end, we set up the fire pit and relaxed!   It took 6 dishwasher loads to get everything clean.  Now I have a few days to relax before hosting our wine group this coming weekend!  At least that is a potluck so it won't be as crazy.   

Thursday, August 11, 2011

Cat in the Box

I am busy trying to get organized for a little sidewalk sale tomorrow and then our dinner party for 20 this Saturday and what am I doing?

Watching Maru videos of course!


You can never have enough Maru!

Saturday, August 6, 2011

37 Things: Donate Blood

This was a fairly simple and easy thing to do on my list of 37 Things I Want to do Before I Turn 38.

However, sometimes the easiest things to do are also the easiest things to skip.

Today was a busy day.  My husband Trevor was running in his fourth (yes, fourth!) half marathon.  I had to drop him off at the start of the race and pick him up at the end.  In the middle of it I found time to run 4 miles myself.  Then I dropped him off at the house to shower and collapse and went with some friends to "Woofstock", a dog adoption fair at the University of Puget Sound.  I saw lots of cute dogs but since Trevor wasn't with me, I couldn't take one home.  Then I went down to the Proctor Arts Fest to see our friend Antoinette who had a henna booth set up.  On the way to her booth I saw the mobile blood donation bus and thought, "This is it.  This is when I am going to finally donate some blood."

I had to fill out some paperwork since it was my first time donating in Tacoma.  They had to check my iron level, my pulse, my temperature, and my blood pressure.  Everything checked out so they were able to take blood.  It was a little crowded on the bus but I felt like a jerk because it was so easy to do and I really had no excuse.  I am not afraid of needles or blood so this is pretty easy for me.  Turns out you can only donate once every 60 days, so I can't donate again until November.  And I am ready to get another tattoo and was wondering about what happens when you have a new tattoo.  But it turns out in the state of Washington that as long as you go to a licensed tattoo parlor, you can donate without any wait period.

Now I really have no excuses!  As a treat, I had Antoinette henna some lovely chrysanthemums on my arm.   And then I had the chance to see my friend Dan sing in the Total Experience Music Choir.  And I ate a corn dog!  It was a fabulous day.

Thursday, August 4, 2011

Making a Shrinky Dink Statement Necklace Part 2

 To learn how to use Shrinky Dinks, read my Making a Shrinky Dink Statement Necklace Part 1.

Once I had all of my Shrinky Dink components colored, cut out, hole punched, and baked, it was time to put the whole thing together.  I made 35 little discs and used 26 of them for the necklace.  I started by making the individual dangles first.  I use stainless steel wire because I don't care about sterling on costume jewelry. 

I used several different beads in when connecting the dangles to the chain.

I played with the placement of the sizes and the colors.  I have been making a lot of asymmetrical necklaces lately but I knew I wanted this piece to be symmetrical since the components were so busy.  It took about 4 hours to make the shrinky dinks (OK, I was watching a movie while I was making them so I am not sure how productive I actually was during a couple of those hours.)  And it took me under an hour to put it all together.

I love how light weight the piece is and how it gently jingles when I wear it. 
Next I am thinking of making napkin rings or place card charms with my left over shrink film.  I also thought too late how awesome these would be as earrings.  That will be on my to-do list as well!