Monday, June 29, 2009

Homemade Pita Bread

For some reason this afternoon, I had a burning desire to make pita bread. I think it was due to the fact that I was planning on making spicy red lentil soup and we had no bread in the house. My sister gave me a recipe for pita bread years ago, but it used a whole 5 lb. bag of flour and I was never much interested in making that much. (Even if I could freeze it!)


PITA BREAD

2 teaspoons yeast or 1 package
1/4 cup warm water
1 teaspoon sugar or maple syrup
3 cups flour (I used 2 cups bread flour and 1 cup whole wheat flour)
1 1/2 teaspoons salt
2 tablespoons olive oil
1 1/4 cups water

Mix the yeast with the warm water and sugar and let sit for 10 minutes to activate. (I've often heard this step is not necessary, but why risk it?)

Blend your flour, salt, and olive oil into bowl of Kitchen Aid. Attach paddle. Add yeast mix. Blend gently for a few whirls and then add in 1 cup of water. If dough is too dry add additonal 1/4 cup water. Blend until it dough forms a ball and then change paddle to dough hook. Let your mixer do the work for 10 minutes or you can knead by hand.

Place dough in bowl that is lightly covered with oil and turn to coat dough. Cover and set aside for 1 and a half hours, until doubled in size. Punch down dough and divide into 12 balls. Cover with damp towel and let rest 20 minutes.

Turn oven to 425 degrees and place either pizza stone or upside down cookie sheet on center rack.

On a floured board, roll out each pita as thin as you can; I try for 1/8th inch. Once oven is warmed, cook 4 pitas at a time for 5-6 minutes. You can turn them if you want, but I tried both ways and found no discernible difference except the turned ones had brown spots on both sides.

These had a perfect air pocket inside and a chewy crust.

I served it alongside spicy red lentil soup.

Saturday, June 27, 2009

Pure Experimentation Stencilry: I am not a doilies and lace type of girl


My online stencil class started yesterday and lots of other students were posting photos of their work last night. I only found time to start working on it today.


Our first lesson is to make a portfolio/folder to hold all of the work we will be making in the coming month. It was a great opportunity to try things out without worrying too much about it. I have been focused so much on yard remodeling and sculpture that it is a nice break to work on some 2-D items.


Mary Ann, the instructor, recommended using found stencils versus making our own for the first project just to get the hang of using them and suggested gathering a lot of doilies and lace to start stenciling with; but I am not a doilies and lace type of girl. I did manage to get my hands on a couple pieces of lace trim, but mostly I had fun trying to find items unique to me that would work well as a stencil.


My favorites were a big plastic tray from a nursery, misc. screws, a scrap bit of the plastic edging I am using around our new patio, dry wall tape, and mosaic mesh backing. I made a mess and had a lot of fun with this first part.

I liked limiting my colors. In fact I almost wish I hadn't added the red. Almost.


The one above is going to be the front cover of the portfolio and the one below is going to be the back cover.


The two below are going to be the inside covers. I like them okay, but I like the other two much better.


I am looking forward to the next class and seeing what else everyone is working on.

Crow Sculpture

I received so many positive remarks about my large Tweet sculpture that I have decided to do a whole series of crows.


This one is pretty close to life size. I am looking at selling them on Etsy. He will retail for $90.


I told my dad that if he happens to be a garage sale and finds a bin full of nuts and bolts to go ahead and buy it for me and today, only 2 days later, he shows up at my house with a bin full of nuts and bolts that he purchased for the bargain price of $1. Now I only need to find more buttons.

Korean Style Grilled Steak and Rose

So I was over at Yum Sugar and saw this delicious looking recipe.


A simple marinade of soy, sesame oil, garlic, sugar, and pepper (I also added cilantro) and some skirt steak and away we go.


The steak turned out so tender and juicy. I skipped the rice cakes the recipe recommended and used red pepper with the green onion and steak. It was lip-smacking. And Trevor brought over some friends that quickly helped to gobble up leftovers.


I paired it with a Famega Rose, a slightly bubbly rose from Portugal. Not bad; dry and crisp and refreshing, but then Trevor came home with a bottle of Yellowhawk Barbara for me and I was in heaven.

Monday, June 22, 2009

Tweets Art Installation and Opening

My friend Barbara Dunshee and I had a show at Gallery 301 in Tacoma in December, but unfortunately were snowed out. Last week we had a chance at a little re-do; only I created all new pieces for the show. I was vary happy with the last minute, short-notice turnout. I sold the Big Tweet (shown below) along with 3 of the smaller tweets.


I've decided I am going to continue to work in this direction with wire and found objects. It is fun to create and guests at the opening were interested in exploring the piece close up. Even my husband said, "Wow, that looks sell-able!"


I had a lot of fun making these little tweets as well. Of course, I ran out of time and was unable to complete the hundreds that I had in mind!


I thought this photo was fun because it really shows off two of Barbara's ceramic faces. (Barbara is on the right.)


Me thanking Barbara for showing with me.


My lovely Friend Julia surprised the hell out of me by showing up since it was the middle of the week and she lives over 4 hours away in Walla Walla!


Me with the Big Tweet.

Living Room Re-do


Can you tell the difference between dark orange and light orange? The first photo is how I painted our living room 5 and a half years ago: Benjamin Moore Pumpkin Cream with black trim.

We still loved orange, but 5 years on it was looking a little shabby, and I was over the black trim.


So I switched to Miller Cheddar Cheese for the walls and DeVine Vanilla in eggshell for the ceiling and glossy for all of the trim. I had to do a primer on the trim plus a couple coats of the glossy. I also finally took the time to replace all of the missing quarter round at the base of the trim.


It took about 10 ten days to complete the look. I am very happy with the results. The white trim tones down the orange and keeps it bright and cheerful. I also painted a cheap Ikea side table in the same fuchsia color that I just painted our front door. (Which also matches the curtains.) I am about to start an online stenciling class this week and plan to stencil on the table when I have acquired new skills.

Wednesday, June 17, 2009

Tweets


I have been working on these bird sculptures for a very temporary installation I am putting up tomorrow. As in people can see them on the 18th from 5:30-8:30pm or they can be seen Sat the 20th from noon-4pm. And that's it. 301 Puyallup Ave. Tacoma, WA.


Wednesday, June 10, 2009

Container Gardening

In our new backyard, we ripped out our old, ugly vegetable/herb garden and are creating a container garden instead. Mostly I decided to do this because we have a cat that used the garden as a litter box whenever possible. I tried to fence off the area with deer fencing and that kept the cats out. It succeeded in keeping me out as well; with the fence I wasn't able to reach the veggies easily either.

So we went down to Bamford and Bamford to buy some pots. We picked out 7 and they are on hold right now for us to pick up on Friday. I was impressed by the amount of pots we were picking out and then I saw this couple in a Lexus SUV walk in and they started picking out pots taller than me and then I realized we were small-time customers.

This black bot with the lime green stripe is one of my favorites and is forming the centerpiece of the display.


I liked this green one quite a bit, but we have decided to go with black pots.


And finally, we aren't using this black, waffle patterned pot, but I realized later and thought it was funny that the fuzzy building you see in the left background is actually where Trevor works on the other side of the Thea Foss Waterway.


The photo below is from Casa Sugar. They always have interesting ideas. I like the rocks around the base of the pots and the red pot as the accent and focal point. I might try the rocks around the base in a few spots with our pots.


I am looking forward to getting the containers home this weekend and playing with their placement.

Rock Yard


Been taking quite a few trips to the local rock yard lately. In fact, I will be seeing them quite a bit in the coming weeks.

The Wm. Dickson Co. is a gravel pit as well as a place where you can recycle big chunks of concrete (cheap!) and these guys feed it into a machine the size of our house and then it spits out little 1 1/4" minus pieces. Nice. That is what we are putting as the base to our walkways and patio. After we compact it, we cover it with landscape fabric, edge it with bricks and fill in with 5/8" minus gravel.


Just wanted to share the crazy photos. Don't be fooled by the scale. The scoop on that loader holds about 3 tons of the crushed concrete at a time.

Friday, June 5, 2009

Dessert for Breakfast


Whenever I do copious amounts of yard work, I crave something sweet and rewarding for the end of the day.

Last night as I made potato salad for dinner, I made a chocolate meringue pie for dessert, and am enjoying it for breakfast as I write.

I made the crust from scratch; it's so easy with a food processor. But I made the chocolate pudding part, I can hardly believe I am admitting this, from a Jell-o mix. I was feeling a little too lazy and tired to make the chocolate pudding from scratch as well.

However, I love making meringue. My meringue tastes good, but this came out a little sub-par in the looks department because I forgot I was out of cream of tartar. Cream of tartar is used as a stabilizer in the egg whites. You can substitute lemon juice, which I did, but it doesn't come out quite the same. I am NOT complaining about the flavor, however.

I'll just have to do it again, this time the whole thing from scratch. Maybe, though, I'll do it when I am having a party; I have 5 slices left!

Re-Do the Backyard: Part 3

I seem to enjoy yard work in extreme weather. First, I hauled out all of the concrete chunks in pouring rain. Yesterday, in 90 degree weather, I decided to fill in our dry well/french drain and haul more rocks!

With our new patio we are putting in, I needed to redirect the drain pipe coming off the back roof. We have always had a problem with water collecting in this area. It is also right where our hose is and I am constantly having to use it to clean out concrete and thin-set buckets, which doesn't help the situation. We have a sub-pump under the house, but I wanted to do something more.

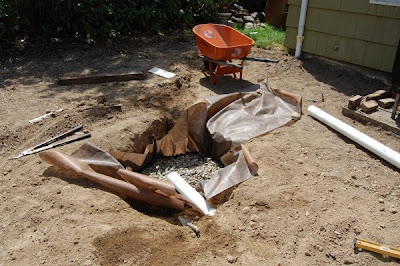
So we had our contractor, Courtney, dig a trench and pit to redirect the gutter water into a pit filled with rocks.

Next, I had to buy drain pipe and an elbow for the redirection of the drain.


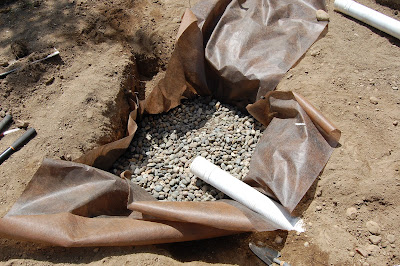
Then I had to line the pit with landscape fabric. If I just dumped rocks in there without the fabric, over time it would fill with dirt and sink and become useless.


Then I had to fill the pit with rocks. Luckily, we had a ton of these rocks from my friend Vicki that was changing the landscaping of her yard a couple years ago. Being garden and yard pack rats, we jumped at the chance to take a yard of rocks, having no idea what we would do with them. We have used a modest amount in the landscaping in the front yard, but now they have found their true purpose for existing. Note my nice new orange wheelbarrow.


Finally, I covered the end of the pipe with landscape fabric before filling in the rest of the rocks and covered them up in a landscape fabric package and then filled in the dirt.


I still need a little more dirt, but by this time (even with a 20 minute break for every 20 minutes I worked) I was pretty sweaty and exhausted and pleased with my work; so I called it good. A large part of this spot is going to be covered with a planting bed to visually block the ugly oil tank and recycling bins.

Broccoli Casserole

OK, I know this sounds kind of boring. The only reason I originally made this is because I was doing a project to cook all of the recipes out of The Splendid Table's How to Eat Supper. In that book it is called Jane and Michael Stern's Broccoli Casserole. It was good, but it was in the bland, comfort food realm. I have adapted it to make it a little spicier, with more interesting cheese, and larger; it makes delicious leftovers.

Broccoli Casserole

6 slices hearty white bread, torn up in bite-size pieces. (Sourdough is great. I used a Pain Au Levain I bought in Portland.)
4 large eggs or 5 small
1/2 cup low-fat milk
4 T butter, melted
3/4 cup grated gruyere
1/2 cup grated cheddar
1/4 cup grated parmesano
1 1/2 teas salt
4 T sugar
1-2 teas chipotle Tabasco
1 jalapeno, minced
1/2 teas red pepper flakes
1 large head broccoli, florets and their stems, chopped finely (about 3 cups)

Preheat oven to 350.
Butter (or non-stick spray) a 9" X 13" casserole dish. Spread your torn bread over the bottom of the pan. It can be up to half of the depth of the dish.


Combine eggs, milk, melted butter, cheeses, salt, sugar, and seasonings in a bowl. Mix well and then add broccoli and thoroughly combine. If mix seems dry, you can add a touch more milk. Pour mixture over bread crumbs.

Cover with foil. Bake for 35 minutes. Uncover and bake 10 or so minutes more to lightly brown the top.


Easy and delicious and infinite variations await; I think of this as my too-lazy-to-cook-anything-complicated-go-to recipe.